- This is the article about the optional dungeon in Golden Sun: The Lost Age. For the general location the dungeon is set within, see Anemos Sanctum.
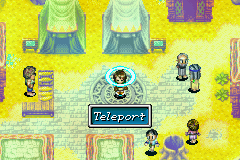
The actual entrance to the lobby of Anemos Inner Sanctum is by casting Teleport, found in Mars Lighthouse, on this teleport pad in the center of Contigo...
Anemos Inner Sanctum is the interior portion of the Anemos Sanctum that serves as an optional dungeon and the one that can be identified as the most challenging of all dungeons in Golden Sun: The Lost Age. It is impossible to reach until one is able to use Teleport Psynergy. The inner part of the sanctum is also unreachable unless one has collected all 72 Djinn in the game. The final boss of the Sanctum is Dullahan, a very difficult enemy to defeat and considered the game's resident "optional superboss".
Main Entrance Lobby[]

...And the entrance to Anemos Inner Sanctum 's actual dungeon area is behind this door, which can only be opened by collecting all of the Golden Sun series' 72 Djinn and activated each of the four "sets" of pads surrounding the door.
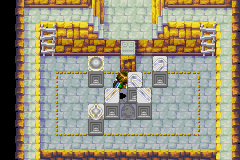
The first room entered if one uses the teleport pad in the middle of Contigo is exceptionally large. If entered from the main corridor a chest and a pyramid block keeps you from exploring the rest of the room until Teleport is acquired. Open the chest for the forgeable Dragon Skin. Beyond this, most of it is an abyss; four separate areas lay in the four corners that represent the four elements. Each area has a large circle in the middle that depicts an example of what that element is; around each pad, there are 18 smaller circles. All of these are places for the 72 Djinn. If you've collected all 18 Djinn of a particular element, then standing on the appropriate elemental pad will prompt the Djinn to light up all of the circles surrounding that pad, signifying your "mastery" over that element. Once all 72 Djinn have been used to light up all four sets of circles, the doorway is opened, and the main dungeon of the Anemos Inner Sanctum can be challenged.
General Dungeon[]
At the beginning of the actual dungeon, indicated by the music (hailing from the original Golden Sun's Sol Sanctum), there is an empty room with a summon tablet at the end. Once you go near it, the screen darkens and words telepathically flash across the screen discussing the sealed power within the slate. Inspecting the slate will get you Charon.
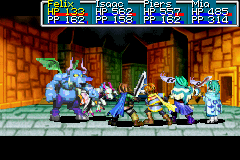
A battle in Anemos Inner Sanctum.
Following Charon, the random encounters with the game's strongest normal enemies begin. After climbing down the stairs, take the left path as the right will lead to a dead-end. Through a door at the top of the room, jump across the gap to your immediate left and enter a room which demonstrates a recurring puzzle unique only to this dungeon: A stone tablet that moves along the left half of the room to mirror your own movements exactly. Moving Felix in his half of the room in a way that the block is moved to a switch on its half of the room opens the door on Felix's side. Now you know how this sort of puzzle operates. In the next room, hop down the two gaps to your right, then at the wooden pillar push it to the right and then enter the door above.
In the next room, hop the gap to the right instead of climbing the stairs above, and you are led to a room with seven black circles on the floor. Step on each one to turn it white, and now walk onto a now-active tile which will elevate you to another door. Through this door, push the immediately visible wooden pillar all the way to the left, then travel and hop through the bottom left path whose trail southwest will lead you down several flights of stairs. When you are in an area of hall with a downstairs door a short ways south of an arrangement of green tiles and sand, check the downstairs to get to a chest containing Dark Matter and come right back up. Then pass right by the green tiles and down into a puzzle room consisting of many weakened floorboards, black floor-lights similar to earlier, and an elevator tile. You must step across all of the lights in here while walking across the cracked floors and then get to the elevator tile on the upper right, without ever stepping on the same cracked tile twice. The space-by-space solution to this puzzle is to walk left once, down twice, left two times, up two times, left twice, down six times, right twice, up twice, right twice, down twice, right four times, up two times, left two times, up four times, and right once; you should end up on an active elevator if followed properly.
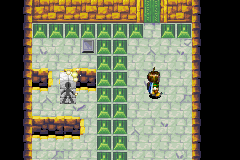
One of the puzzle rooms in Anemos Inner Sanctum in which Felix's movements prompt an animate tablet on the other side of the room to mirror him.
After taking the elevator, follow the route down a stairwell. In this horizontal hallway, go left and push the pillar all the way to the left, then head all the way right to enter the rightmost door. You are now in one of the biggest rooms in the dungeon, featuring such things as a Liftable boulder and a Moveable log pillar. First, cast Lift on the boulder and then go south of it through a door, then jump across the gap to the left and follow its path to another room with a magically animated tablet that mimics your every movement. In this puzzle, you'll see how when the tablet comes into contact with the green block in front of it, it will pin itself against it as Felix continues to walk up. With this in mind, and treating the room as a tiled room measurable in invisible "spaces", move Felix up two spaces, left one space, up two spaces, right one space, down a space (so that Felix is now matching the position of the green tile), up three spaces, left a space, up two spaces, and right onto the switch, opening the door.
Through the door you now enter the lower right corner of the big room. Hop and push the rightmost earth pillar onto one of the two circular "slots", then retrace your steps through the last room so that you're now back at the Lift-able boulder. Lift it up again and this time go through the north door. Following it's path will take you right back to the big room, now on the right area. Hop down to where the two pillars remain and push the right one onto the other circular slot, using Move if necessary. Retrace your steps so you're back at the boulder, use Lift on it, then go south, right, and up so you can then use Move on the leftmost wooden pillar. Move it to the right twice, then hop up to where there is an earth pillar to the right of the currently-floating boulder. Move this pillar seven times to the left onto the switch to open the left door, thus solving the whole room and achieving its objective.
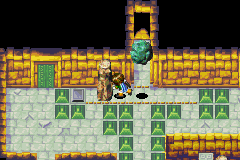
This large room later on in the dungeon ultimately requires you to push this earth pillar onto this switch to open the door to the left.
Following the big room with the lift-able boulder, you are soon guided to the third and final puzzle-room that features a magic tablet that mirrors Felix's movements. To solve this puzzle using the same "imaginary grid" mindset as the previous such room, move Felix up two "spaces", right two spaces, up two spaces, right one space, up two spaces, left one space, down two spaces (so that Felix and the block are now horizontally aligned), right one space, up two spaces, left one space, up two spaces, and left until on the switch. The door opens, and beyond it you are immediately presented with two entrances. Go down the left stairs to get to a chest containing an Orihalcon, then come back up and enter the rightmost door.
You are now in a massive room with platforms above a black abyss, and nine cracked floor tiles in front of you that pretty much make you choose which one of three forking paths to take. Walk up, left, up, and left to take the left hop-able platform path, and walk clockwise until in an upper area you have three forks. Take the right fork, then use Move on the visible earth pillar to move it one space right. Go back to the fork and take the bottom fork, back onto the cracked tiles, and move down, right, down, and right to go across the right hop-able platform path. Stand on the line of sand and cast the Sand Psynergy to use the sand trail like how the Sand Psynergy was used in the Ankohl Ruins dungeon, and emerge right next to the earth pillar. Push that right out of your way, then go north and the path guides you counter-clockwise to another earth pillar, which you should push left once, and then go right into the door above.
This puzzle is essentially about arranging the tiled blocks to match the bird pattern on the ground below.
Now at the final room of Anemos Inner Sanctum which is devoid of random encounters, you are presented with a puzzle that is easy to solve in concept but time-consuming in execution. A six-tiled pattern depicting a bird-like image on the ground is surrounded by six Move-able blocks each depicting a piece of the same pattern; just arrange the blocks so that they rest upon their corresponding pieces of the pattern below. One of the many solutions is to move the rightmost block left five times, the lower right block up and left, the leftmost block up once and right five times, the upper right block left three times and down one time, the lower left block right twice and up twice, and the upper left block down three times, right two times, and up one time. If done properly, the bird image on the top of the blocks will immediately glow purple, and you can then hop onto it from the elevated platform in front of it.
Save your game now. Then prepare your entire party accordingly. For as soon as you stand on the big circular portion of the bird block pattern and cast the Hover Psynergy like what you would have done with similar patterns in Jupiter Lighthouse, the bricks levitate and transport you across a chasm to the other side. You then automatically engage in a boss encounter with the single most powerful opponent in the Golden Sun series, Dullahan. If you are merely "testing" the battle out then you can be guaranteed to be completely annihilated in a matter of turns, but it is still recommended to test the battle nonetheless before attempting it seriously with a summon-based strategy such as those covered here. Should the player successfully destroy Dullahan, the summon tablet containing the most powerful summon offensively and curatively, Iris, can be collected, and the dungeon considered complete.
Enemies[]
| Bestiary of Anemos Sanctum | ||||||||||
| Monster Name | LVL | HP | ATK | DEF | AGI | EXP | Coins | Weakness | Drop | Drop Rate |
| Bombander | 40 | 548 | 541 | 224 | 141 | 624 | 325 | 1/64 | ||
| Grave Wight | 40 | 460 | 530 | 213 | 151 | 551 | 379 | 1/32 | ||
| Mad Demon | 40 | 745 | 567 | 234 | 213 | 671 | 363 | 1/256 | ||
| Sky Dragon | 40 | 657 | 562 | 232 | 191 | 686 | 358 | 1/128 | ||
| Dullahan (boss) | 50 | 16000 | 676 | 269 | 241 | 15600 | 6775 | N/A | N/A | |
Collectibles[]
There are actually very few things to collect in Anemos Inner Sanctum treasure-wise; the sanctum is most notable for the desirable, albeit extremely rare, drops from the randomly encountered monsters, as covered above.
![]() Dragon Skin: Found in a chest within the main entrance chamber when entering the Sanctum using the Reveal method.
Dragon Skin: Found in a chest within the main entrance chamber when entering the Sanctum using the Reveal method.
![]() Dark Matter: In a chest earlier on in a room that you can access either by climbing down a stairwell or falling through a cracked floor tile in a room with many linearly arranged cracked floor tiles interspersed with floor lights and an elevator tile.
Dark Matter: In a chest earlier on in a room that you can access either by climbing down a stairwell or falling through a cracked floor tile in a room with many linearly arranged cracked floor tiles interspersed with floor lights and an elevator tile.
![]() : Orihalcon: In a chest later on in a room that you can access either by climbing down a stairwell or falling through a cracked floor tile in the big room with the huge abyss.
: Orihalcon: In a chest later on in a room that you can access either by climbing down a stairwell or falling through a cracked floor tile in the big room with the huge abyss.
Glitches[]
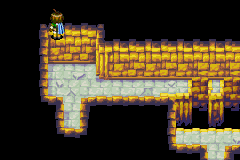
A tile of wall in this unassuming room has had its collision detection forgotten to be applied, allowing Felix to walk the black mass surrounding the room.
There are two instances of glitches present in Anemos Inner Sanctum that are the result of overlooked patches of collision detection, and the two occur in neighboring rooms. The first is in the large room that features a Liftable boulder, and whose overall goal is to push the earth pillar to the right of the boulder onto the switch tile to the boulder's left, where the pillar settles permanently. Once you achieve that, however, if you stand just to the right of the pillar and walk left, you will walk "into" it right before instantly warping to the top of the pillar, and be rendered completely unable to move around. You can easily get out of this glitch by casting Retreat, but it should still be considered unrecommended to save while on top of the pillar.
The other glitch is in the small room that connects the top center and right doors of the big room together. When you enter the small room through the top center door so that you're in its upper left area, hug the wall in front of you and you should find that the upper leftmost patch of wall can be walked through as if it were an illusion. You can then walk into the black "abyss" surrounding the room and walk the whole way around it, with random encounters as usual.