The full three-headed appearance of the Doom Dragon, the final boss of The Lost Age.
The Doom Dragon is the final boss in Golden Sun: The Lost Age, fought on the aerie of the game's final storyline dungeon, Mars Lighthouse. It is powerful and very durable, and a longer-lasting battle than any other, making it very difficult to unprepared players. It is the final obstacle to defeat in The Lost Age, and defeating it leads the player to the game's ending. A wooden and much smaller copy of the Doom Dragon appears in Golden Sun: Dark Dawn early in the game as the final boss of the Psynergy Training Grounds.
As a boss

Doom Dragon Sprite.
The Doom Dragon boss encounter takes place at the end of the final storyline dungeon in The Lost Age, Mars Lighthouse, and is treated as the game's final boss in that after it is defeated, the remaining material of the game is cutscene material leading up to the ending. The scripted encounter, with an appropriately lengthy procession of story-intensive cutscenes prior to the battle, triggers when after you use the Teleport Psynergy to warp your party to the top of Mars Lighthouse, you approach the area where the well for the Mars Star is.
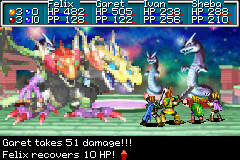
The Doom Dragon is a unique encounter in that it technically counts as three enemies, one fought right after the other in the same battle, with each representing a different "form" of the beast (presented as the three-headed dragon steadily losing heads over the course of the battle). The three forms taken together gives the Doom Dragon a grand total of 13,200 HP, which is only beaten out by the HP rating of the optional boss Dullahan (16,000 HP), and has 5,000 PP, but is not counted because of the Mars lighthouse (full PP restoring effect for Mars users) until the red dragon head is cut off (probably representing the Mars-based nature of the head, connecting the dragon with the element) the Doom Dragon regenerates all its PP. All three forms share an Attack rating of 470, a Defense rating of 155, an Agility rating of 200, and a Luck rating of 50. In terms of resistance, all three forms have a Venus Resistance rating of 195, a Mars Resistance rating of 175, a Mercury Resistance rating of 130, and a Jupiter Resistance rating of 98, and in regards to their abilities they uses their available Venus-based attacks with a power rating of 110 and their available Mars-based attacks with a power rating of 105. Defeating it equates to completing the game's final challenge and allowing you to see the ending material of the game's story.
First stage (Three heads)
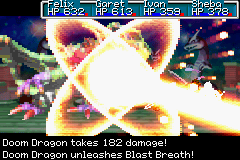
Doom Dragon unleashing its Blast Breath monster skill, its "main" offense in its first form.
The first stage of the Doom Dragon battle features 5000 HP, and the dragon can act four times per turn. It uses the following battle commands:
- Blast Breath: This is a monster skill where the dragon blows out a large, searing beam of white-hot energy through the Adepts, dealing a Mars-based attack with a power rating of 170 and a range of 3 (the adepts to either side of the targeted Adept will only take 50% of the attack's force, instead of the normal 80%, however). In addition, each affected Adept's Defense rating may be lowered by 12.5%. This can be considered the strongest attack this first form of Doom Dragon has.
- Cure: This is a Psynergy spell that restores roughly 70 HP to the user, consuming 3 of its user’s PP.
- Curse: This is a Psynergy spell that briefly generates a candle icon at the target Adept's position, and the target has a chance to get inflicted with a 7-turn Death Curse status ailment. This ability consumes 6 of the monster's PP. Considering this is a many-turn boss battle, Curse may end up downing an Adept not properly tended to.
- Defend: This monster has the ability to cut all damage it would take this turn in half, regardless of how fast the party acts.
- Djinn Blast: A unique monster skill that erupts a mass of multicolored energy around a targeted Adept, putting into Recovery mode all of the Djinn on that party member. A very negative effect indeed, often prompting players to switch out the drained Adept with another reserve Adept and wait out the many turns necessary for at least the majority of the Djinn on that Adept to Set themselves back.
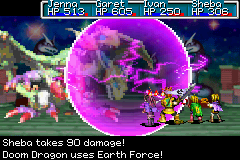
- Earth Force: This is a monster skill where the dragon blows out a large. purple, electrically-charged sphere representing a high-gravity field, and the sphere slowly approaches a targeted Adept and instantly disappears upon contact, knocking the Adept far back off the screen. When the effect actually connects, it renders the Adept unable to move for one turn; it is likely that it will not have any effect at all, however.
- Earthquake: This is a Psynergy spell that launches multiple Adepts into the air twice each, dealing a Venus-based attack with a power rating of 35 and a range of 5. This ability consumes 7 of its user's PP. Note that this form of Doom Dragon also has access to the upgraded Quake Sphere Psynergy.
- Fiery Blast: This is a Psynergy spell that creates a moderately large explosion, dealing a Mars-based attack with a power rating of 110 and a range of 5. It consumes 19 of its user's PP.
- Flare Storm: This is a Psynergy spell that generates a 3-stacked mass of fire that goes through multiple Adepts, dealing a Mars-based attack with a power rating of 80 and a range of 3. This ability consumes 12 of its user's PP.
- Gravel Blow: This is a monster skill where the dragon breaths what appears to be a shower of solid brown rocks at the Adepts, dealing a Venus-based attack with a power rating of 90 and a range of 3 (the adepts to either side of the targeted Adept will only take 50% of the attack's force, instead of the normal 80%, however).
- Haunt: This is a Psynergy spell that causes a mass of purple skull symbols to swirl into each party member, and each affected party member has a chance to get inflicted with the Haunt status ailment. This ability consumes 5 of the monster's PP and has a range of 3.
- Psy Boost: This is a monster skill where the user briefly absorbs white energy, and will restore roughly 20PP.
- Quake Sphere: This is a Psynergy spell that launches multiple Adepts into the air three times each, dealing a Venus-based attack with a power rating of 65 and a range of 7. This ability consumes 15 of its user's PP.
- Thorn: This is a Psynergy Spell that generates a small mass of thorny spiked vines at the position of the party of Adepts, dealing a Venus-based attack with a power rating of 35 and a range of 3. It costs the user 6 PP.
In addition, there will be many times when at least one of the boss' four moves will be nothing, and the battle text will read "Doom Dragon can't move!". This usually occurs after Blast Breath.
Second stage (Two heads)

Doom Dragon with its two heads left.

Doom Dragon summons the Cruel Ruin sequence which will engulf the Adepts in destruction.
The second stage of the Doom Dragon battle features 4200 HP, and the dragon can act three times per turn. With each action it may perform one of the following battle commands:
- Blast Breath: Carried over from the first stage, this continues to be a rather strong multi-target Mars attack the Doom Dragon may use freely, lowering each affected target's Defense at times.
- Briar: This is a Psynergy Spell that generates a mass of thorny spiked vines at the position of the party of Adepts, dealing a Venus-based attack with a power rating of 70 and a range of 3. It costs the user 11 PP.
- Clay Spire: This is a Psynergy spell that causes three thick stalactites to fall from the sky onto the Adepts and shatter on impact, dealing a Venus-based attack with a power rating of 85 and a range of 3. It costs the user 13 PP.
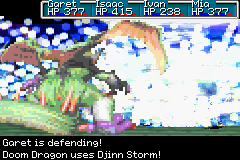
- Cruel Ruin: Arguably the ability Doom Dragon is infamous for. This monster skill is a Summon sequence-style effect displaying an elaborate sequence of apocalyptic imagery that ends with the entire party being consumed within a titanic beam of destructive energy. It is a Venus-based attack with a base power rating of 200. The game treats the ability as a summon with a damage multiplier of 40% (see the Summons page), as high as the multiplier Iris uses. This is why Cruel Ruin does more damage to a higher-leveled party than a lower-leveled one, but regardless of the party's levels, the damage output will be colossal. Doom Dragon can use this freely, and rather often as well. This is the single ability that thoroughly damages and even wipes out inadequately prepared parties, so Psynergy like Cool Aura and Pure Wish, guarding Djinn like Flash and Shade, and maybe even the regenerating summon Coatlicue are imperative.
- Curse: Carried over from the first stage, this continues to be a "minor" effect that takes a long time to work, but because this final boss battle takes a lot of turns to begin with, Curse may end up downing an Adept not properly tended to.
- Desert Gasp: This is a monster skill where the dragon breathes out a stream of grainy sand at the party, dealing a Venus-based attack with a power rating of 45 and a range of 3 (the Adepts to either side of the targeted Adept will only take 50% of the attack's force, instead of the normal 80%, however). In addition, each affected Adept's Defense rating may be lowered by 12.5%.
- Djinn Blast: Carried over from the first stage, this continues to cause the occasional party member to be severely weakened for a good period of time. An Adept that has been afflicted with this will be much more likely to be wiped out if Doom Dragon uses Cruel Ruin.
- Earth Force: Carried over from the first stage, this continues to be an ability that rarely works its intended stun effect, and thus is something one might start hoping to see more of in place of other damaging abilities.
- Guard Aura: This is a monster skill where the dragon is veiled by a translucent wall of energy, cutting down all damage it would incur this turn down to a mere 5% - it is practically invulnerable, and this move always acts first during a given turn regardless of the party's speed. Part of what makes Doom Dragon much tougher to take down later on in the fight.
- Haunt: Carried over from the first stage, this continues to be a relatively "harmless" effect which only has a chance to inflict some Adepts with an effect that has a chance to cause them damage whenever they act.
- Inferno: This is a Psynergy spell that causes a mass of balls of fire to spread out from the user and home in to each of the Adepts, dealing a Mars-based attack with a power rating of 140 and a range of 5. It costs the user 23 PP.
- Serpent Fume: This is a Psynergy spell that shoots out a large serpentine entity of flame from the user that widely arcs over to crash into a targeted Adept in an explosion, dealing a Mars-based attack with a power rating of 130. It costs the user 14 PP.
- Spire: This is a Psynergy spell that causes a thick stalactite to fall from the sky onto a targeted Adept and shatter on impact, dealing a Venus-based attack with a power rating of 40. It costs the user 5 PP. Note that Doom Dragon in this form also has access to the upgraded Clay Spire Psynergy.
Third stage (One head)

Doom Dragon with one head left.
Doom Dragon unleashing its Djinn Storm monster skill, one of the most crippling and dangerous effects in the game.
The third stage of the Doom Dragon battle features 4000 HP, and the dragon can now only act two times per turn. The physical number of moves in the Doom Dragon’s inventory is now lower than before. It has lost its Mars based abilities due to the red dragon head being cut off. In spite of this, the Doom Dragon becomes immensely more dangerous than even its second stage, because with each action it may perform one of the following battle commands:
- Cruel Ruin: Carried over from its second form, Cruel Ruin continues to be a massively damaging, party-member-downing summon-style spell that gets parties scrambling to heal themselves in short amounts of time. It is used even more often in the third stage of the battle than in the second, and coupled with the Djinn Storm ability, it makes Doom Dragon very hard to survive.
- Darksol Gasp: This is a monster skill where the dragon blows out a mass of dark energy against the party, dealing a Venus-based attack with a power rating of 230 and a range of 3 (the adepts to either side of the targeted Adept will only take 50% of the attack's force, instead of the normal 80%, however). In addition, each affected Adept may be inflicted with Haunt.
- Djinn Storm: The upgrade of Djinn Blast, this unique monster skill is most likely the single most crippling and dangerous effect in the Golden Sun series. A screen-filling mass of multicolored energy erupts around the entire party, putting into Recovery mode all of the Djinn on all currently battling party members. This makes the entire party much weaker for quite a few turns, and a lot more susceptible to attacks, especially from the likes of Cruel Ruin. It is entirely possible for Doom Dragon to first use Djinn Storm and then Cruel Ruin as its two actions in a given turn; this offense is so powerful and so likely to down even Adepts at full HP that inadequately prepared players are very likely to lose the battle at this stage.
- Earth Force: Carried over from the both of the previous stages, this monster skill continues to feel mercifully "useless", rarely causing its intended effect of Stunning a targeted Adept. This is an ability the player hopes Doom Dragon uses at this point.
- Guard Aura: Carried over from the second form, this monster skill continues to render the Doom Dragon nigh-invincible for the occasional turn.
- Nettle: This is a Psynergy Spell that generates a large mass of thorny spiked vines at the position of the party of Adepts, dealing a Venus-based attack with a power rating of 140 and a range of 5. It costs the user 23 PP.
- Stone Spire: This is a Psynergy spell that causes five large and thick stalactites to fall from the sky onto the Adepts and shatter on impact, dealing a Venus-based attack with a power rating of 160 and a range of 3. It costs the user 22 PP.
Strategies
First of all, this being the literal final battle of a given game and one where you're not allowed to save after winning it (other than Clear Data after the epilogue, of course), players who typically conserve hard-to-get healing items like Psy Crystals and Water of Lifes for later use are strongly encouraged to distribute them evenly among all the Adepts, and use them whenever they would be helpful.
An important thing to note about the Doom Dragon before attempting to battle it seriously is that it is not one enemy with 13200 HP, but rather 3 enemies in a row, each having between 4000 - 5000 HP. Therefore, a straight-forward "summon-rushing" approach will do nowhere near as much damage against a Doom Dragon form as, say, the single-encounter 16,000-HP boss Dullahan, since summon spells increase their damage in proportion to the maximum HP meters of enemies. Thus, what would do over 3000 damage against Dullahan would do only over 1000 damage against Doom Dragon, so Doom Dragon essentially has to be battled at length in order to ensure you survive its attacks in between.
Many Psynergies and other maneuvers the Doom Dragon performs in its first form are quite weak, so your real assaults should be saved for the more dangerous later forms.
If you're planning on using strong Summon sequences against Doom Dragon regardless, then keep one very important rule in mind: do not use up your summons against the first form of Doom Dragon, because its abilities are actually quite weak in comparison to the abilities used by the second and third forms. Doom Dragon's first form, which has 5000 HP, can be easily dealt with at length even with a party that keeps a good amount of its Djinn On Standby for later use. It is when the Doom Dragon enters its second form and starts using powerful Cruel Ruin attacks that is a good time to unleash Summons and cut the amount of time spent battling by a good amount. But beware; in the second and third forms, Doom Dragon may decide to use Guard Aura in any given turn, which would negate almost all damage it would take from summon spells and any other damage source. A good way to approach this is to only perform portions of your summoning capacity over several different turns, rather than using all summons in one turn and risk having them all negated together by a random Guard Aura.
Because of how Doom Dragon in its third form can use Djinn Storm to put all of your current battling Adepts' Djinn On Recovery, thus severely weakening them and/or denying them their ability to summon for many turns, it should be considered imperative to have all your party members leveled up well. Being at higher levels makes a big difference in a party of drained Adepts' ability to keep themselves alive and possibly even still do some damage, as they have more of all the important statistics to work with. It is highly recommended to level grind with EXP-rich Wonder Birds at Islet Cave, both for the sake of getting stronger statistically and for gaining access to the final upgrades in important healing Psynergy series like Cool Aura and Pure Ply. Speaking of which, these party-healing spells are invaluable for restoring off the mass-damage caused by repeated Cruel Ruin spells, at least in the second form. However, in the third form, if all of your Djinn are drained from Djinn Storm, these healing Psynergies will be made unavailable (they are only available to higher classes). Thus, it should likely be considered important to stock up on Mist Potions sold at Prox using the money gained from level grinding, and distribute them amongst the choice Adepts. Restoring 300 HP to all current battling Adepts, these make a fine but expensive substitute for Pure Wish and Cool Aura and should definitely be used to improve your survivability.
The Doom Dragon battle is an ideal example of a boss battle where a particular equipment setup for one of your Venus Adepts will help out immensely. The game's best weapon is the Sol Blade because of the immense, multiplicative power of its Megiddo unleash effect, which works wonders against Doom Dragon despite it having near-maximum Venus resistance. However, the Sol Blade, like most other weapon Artifacts, only has a 35% chance to Unleash its effect when the equipped Adept performs a straight physical attack. But the Unleash chance can be increased all the way to 99% if the equipped Venus Adept is also equipped with the Valkyrie Mail (which adds 20% to the Adept's Unleash rate), Riot Gloves (which adds another 20%), a Mythril Helm (which adds 12% more), and Hyper Boots (which adds 12% more). The Valkyrie Mail is found easily in a chest earlier in Mars Lighthouse, and Hyper Boots are pretty easy to win from Lucky Wheels at Contigo, but a Mythril Helm is randomly forged from the Mythril Silver material while Riot Gloves are a very rare drop from a Minos Knight in Yampi Desert Cave (if you don't abuse the game's Random Number Generator, of course). If you can't get these last two items, the somewhat weaker Aegis Shield (+10% to Unleash rate) and the previous game's Warrior's Helm if it was transferred (+10% to Unleash rate) can be used to at least get the warrior's Unleash rate up to 87%. At any rate, having one of your Venus Adepts being able to unleash a devastating Megiddo essentially every turn makes an impressive difference in how fast the Doom Dragon battle goes by. (And of course it goes without saying that the battle will also be made easier if the other Adepts are equipped with weapons like Excalibur, Tisiphone Edge, and Masamune.) Of all weapons, the Excalibur's lucky 3x Legend Unleash would deliver the most damage in this battle (around 1.3x - 1.5x the damage as Sol Blade's Unleash), but can be inconsistent.
Because this battle takes place in the Mars Lighthouse, Garet and Jenna will always recover their PP in full. If you plan on using their PP's in this fight, this would be a good way to utilize it.
Handy and Effective Battle Strategy
This worked for me--give it a go or wing it yourself. I recommend going djinn-hunting so that you will have, in total, at least 15 of each(this should have you in pretty good stat-condition, just have everyone in their respective mono-elemental classes and you'll be fine). Order your party in such a way so that the first four to fight the doom dragon are Isaac/Felix, Sheba/Ivan, Mia, and Garet/Jenna. Give Garet or Jenna the powerful defense djinni Flash, and make sure that Mia can cast Wish Well. Also make sure Isaac/Felix has equiped the Sol Blade(and it is easy to find!). Every round, have Isaac/Felix attack and hope for Megiddo. Have Mia spam Wish Well every other turn. She she ought to use it after the turns Garet/Jenna unleashes Flash, and when (s)he takes a turn to set it, have her Wish Well then. When she's not using Wish Well, have her as a healer for the various status condidtions that may be afflicted upon you by the Doom Dragon. As for Sheba/Ivan, you can have them cast Impact on Isaac/Felix to deal more damage, you can spam various offensive Jupiture attacks, or(and I recommend this the most), have Sheba/Ivan unleash one Jupiture djinni each turn to hurt the Doom Dragon, and when the time is right, summon Thor to deal at least a thousand damage, if the Doom Dragon has not used Guard Aura, so time it right. This ought to last you through the first and second head(using Flash will keep ALL damage to under twenty, no more than sixty when it uses Cruel Ruin), and if it downs you all, fear not! Just do the roughly the same thing with your backup party. This will kill the Doom Dragon with little or no stress to you, and the only problem is that it could take a while. You don't even need Class-Changing items or eleborate summon tablets, but feel free to get them if you want. When you kill it, sit back, relax, and enjoy the endgame-cutscenes. Thanks!
Story

The Adepts begin the battle with the Doom Dragon at the aerie of Mars Lighthouse.
After the activation of Jupiter Lighthouse, Isaac's party joins forces with Felix's party, and the combined party of Adepts travels north to Mars Lighthouse with the intention to activate it with the Mars Star, knowing that the world would eventually physically wither if Alchemy is not released in time. The entity responsible for originally pitting Isaac's group against Felix's quest to restore alchemy, the Wise One and the guardian of Alchemy's seal, thus decides to lure the parents of Felix and Isaac's father Kyle away from the nearby town of Prox towards Mars Lighthouse and uses his god-like powers to transform the three adults together into a colossal and powerful but mindless and bestial three-headed dragon.
When the Adepts arrive at the tower's top, they have their fateful encounter with the Wise One, who berates Isaac for disobeying his command and warns that releasing the great power of Alchemy would allow those evil among Weyard's populace to abuse it and cause wars and strife. When the Adepts are not dissuaded, the Wise One then summons his creation for the Adepts to battle in order to earn the right to light Mars Lighthouse. Isaac quickly realizes in secret the truth behind the dragon's true nature, but he makes the decision to place the fate of the world above the fate of their own parents and charges into battle with the rest of the unwitting Adepts. After an epic and harrowing fight, the beast is slain, and reverts to the dead forms of their parents. The rest of the horrified Adepts are driven to grief over the realization of the cruel trick the Wise One committed, but Isaac explains that he knew what he was doing and explains why he made the decision to go through with his fight, and everyone else agrees this was the price necessary to save Weyard. The Mars Lighthouse is subsequently lit, releasing Alchemy.
When the Mars Beacon is set alight, the elemental power it exudes miraculously revives the parents, and the Adepts bring the adults back out of the lighthouse and return to Prox, where the parents are nursed back to health by the people of Prox. Isaac later ponders why everything happened at Mars Lighthouse the way they did: The Wise One had turned the parents into a dragon that Isaac and the others were forced to fight and pretty much kill, yet the way the parents were revived back by the beacon's light suggests the Wise One had to have known that would happen in advance. Kraden hazards a guess with wild implications: The Wise One's actions were all part of his grand scheme to test Isaac and his companions as individuals capable of the great responsibility of ensuring that throughout the world, Alchemy is not abused and used for evil. In slaying the dragon knowing full well that he would be killing the ones he hoped to be reunited with, but placing the welfare of the world over the more personal elements which he holds dear to his heart, Isaac has demonstrated the emotional fortitude needed to make the tough but right choices.
Trivia
- Doom Dragon has the same role of Fusion Dragon as the final boss in every Golden Sun game.
- The colors of the heads on the Doom Dragon match up with the elements of the Adepts the Wise One used and transformed to create the monster - 2 orange heads representing the two Venus Adepts (Kyle and Felix's father), and 1 red head representing Jenna's mother, a Mars Adept.
- The Doom Dragon, during its final phase, somehow becomes heavily Venus-based and loses its ability to utilize Mars-based Psynergy. One possible reason for this could be because the head that is cut off in the second phase is the red head (Jenna's Mother, a Mars Adept) and therefore severs its link to wielding Mars Psynergy.
- Oddly enough, the in-game sprite for the Doom Dragon has the red head on its right, but the battle sprite has it switched to the left. This could have been a slight mistake, or just a strange coincidence.
- The Doom Dragon battle is the only battle in the Golden Sun series that progresses with the boss assuming different stages and forms over time.
- The unique final boss music heard in the battle with Doom Dragon is remixed and used alongside a remix of Felix's battle theme together as one song in Super Smash Bros. Brawl. The track is playable on the "Norfair" multiplayer stage.
| Bosses in Golden Sun | |
|---|---|
| Vault Bandits • Tret • Saturos • Killer Ape • Hydros Statue • Manticore • Kraken • Toadonpa • Storm Lizard • Tempest Lizard • Saturos and Menardi • Final boss • Deadbeard | |
| Bosses in Golden Sun: The Lost Age | |
| Chestbeaters • King Scorpion • Briggs and Sea Fighters • Aqua Hydra • Serpent • Avimander • Poseidon • Moapa and Knights • Karst and Agatio • Flame Dragons • Final boss • Valukar • Sentinel • Star Magician • Dullahan | |
| Bosses in Golden Sun: Dark Dawn | |
| Tangle Bloom • Dim Dragon • Dim Dragon Plus • Stealthy Scout • Sand Prince • Ku-Tsung and Ku-Embra • Ice Queen • Sludge • Mountain Roc • Blados and Chalis • Blados, Chaos Hound, and Chalis • Final boss • Ogre Titans • Ancient Devil • Star Magician • Dullahan | |