Dullahan is an optional superboss found at the end of The Lost Age and Dark Dawn. In both games, it is by far the strongest challenge and rewards the most powerful summon, Iris.
Description[]
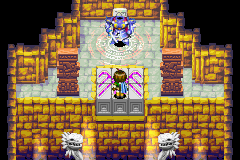
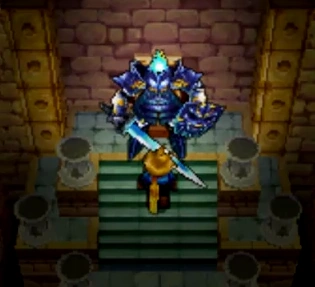
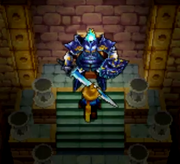
It is located and fought at the end of the optional dungeon Anemos Inner Sanctum in Golden Sun: The Lost Age, and it is the deadliest boss in the game. Dullahan awaits daring players willing for the game's biggest battling challenge and guards the summon tablet containing the most powerful summon sequence in the game, Iris. Dullahan makes a reappearance in Golden Sun: Dark Dawn, once again guarding the Iris summon tablet. This time, he can be found on "Treasure Isle" a new dungeon resembling Crossbone Isle from the original Golden Sun.
Background and story[]
Dullahan awaits Adepts brave, capable, or foolish enough to challenge him for the Iris summon tablet.
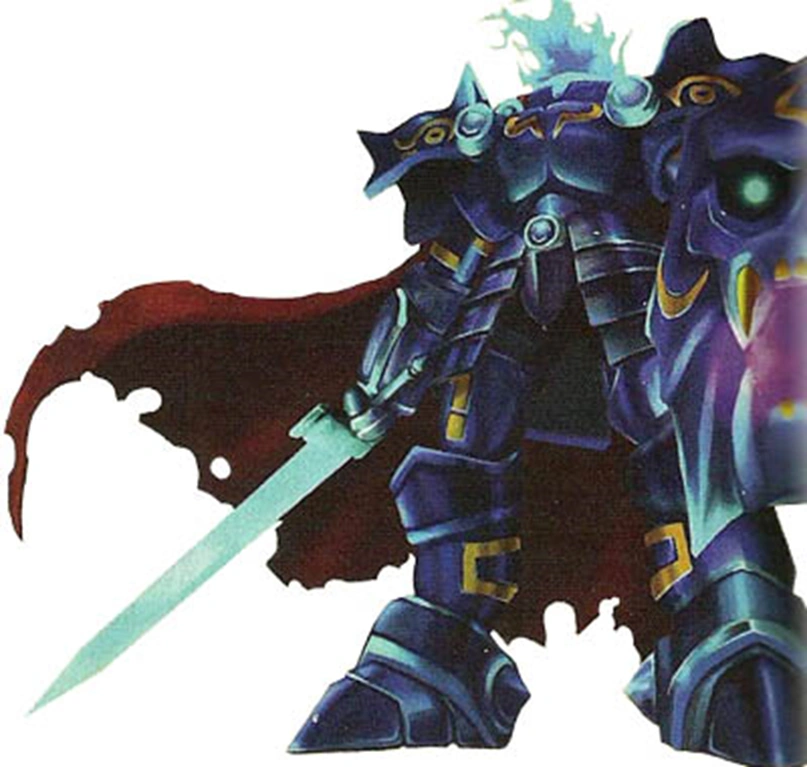
Dullahan, resembling a large, animate suit of purplish armor with nothing where its head should be, does not have any bearing on the game's actual story, nor is any background information provided.
Should any group of intrepid Adepts brave the Anemos Inner Sanctum's traps and dangers and make it to the dungeon's end, seeking the Sun's power, they will reach a chamber where using the power of Anemos will ferry them to the platform where Dullahan and the summon tablet await. Dullahan will speak telepathically to his challengers to introduce himself before pulverizing the opposition:
- “I am the shadow, the keeper of light. If you want the sun’s power, show me your own.”
In The Lost Age, as Isaac and Felix's combined party of capable Adepts nears the end of its quest, they may decide to return to Contigo and explore the Anemos Inner Sanctum as they have so many other dungeons if they have all the Psynergy powers and Djinn necessary to do so. Their encounter with Dullahan will be the most fierce battle they will ever wage, but should they actually manage to defeat the entity, they will gain the ability to summon the embodiment of the Sun's power, the goddess Iris, in future battles.
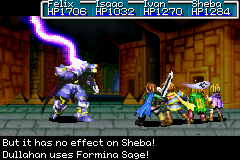
The power of Dullahan can be harnessed to a degree by Adepts wielding dark magical arts such as those provided by the Tomegathericon. An Adept proficient enough to be called a Necromage may summon an image of Dullahan himself to abuse an enemy by swinging an immensely long sword fashioned from purple lightning, the Formina Sage.
As A Boss[]
Dullahan is a boss much more powerful than the final boss encounter at the end of Golden Sun: The Lost Age, but he is optional. Therefore, he fits the bill of the Golden Sun series' "Superboss", something many RPGs have as a final challenge for players before they finish the game.
Dullahan is encountered at the end of the optional Anemos Inner Sanctum dungeon, which can only be entered and explored in a data-enhanced game of The Lost Age by method of transferring all Djinns from the first Golden Sun. Specifically, to open the door to continue into the maze to approach Dullahan, all Djinn possibly attainable from Golden Sun and Golden Sun: Lost Age will be required. Following navigation through the puzzles, the battle will begin after solving a puzzle involving moving six blocks so they form an image of a bird, and then hopping onto the blocks and casting the Hover Psynergy. The blocks will lift up and transport you to the platform on the other end, where Dullahan awaits and the battle automatically begins.
Dullahan attacks the party with some truly frightening assaults, such as fashioning a sword of purple lightning called Formina Sage to attack an Adept with extreme power, as well as summoning Charon.
Dullahan, statistically, has far higher numbers than any other enemies for several of its statistics. He has the highest HP rating in the game, 16,000 HP, and regenerates 200 each round. He has 300 PP, which, while lower than certain other bosses, regenerates at 100 PP per turn, effectively giving him unlimited PP. He has higher Attack and Defense ratings (676 and 269, respectively) than any other monster, and his 59 Luck is higher than any other enemy in The Lost Age, outdone only by Deadbeard's 60 Luck in Golden Sun. Dullahan's 241 Agility is the only stat outdone by other monsters, which are the Star Magician and its Guardian Ball minion, as well as every monster in the Phoenix monster line. Compounding his astronomically high statistics is that he acts three times per turn, a trait shared only by the Doom Dragon, Sentinel, Wonder Birds, and the Serpent if it hasn't been weakened by sunlight. In terms of resistance, Dullahan has a Mercury resistance rating of 190, a Venus resistance rating of 150, a Mars resistance rating of 130, and a Jupiter resistance rating of 110. If Dullahan is defeated in battle, you are awarded 15600 EXP, 6775 coins, and can reap the ultimate summon tablet Dullahan was guarding, the Iris summon.
Hard Mode is a replay mode where all enemies possess 1.5 times their normal HP meters and 1.25 times their normal Attack and Defense ratings. Interestingly enough, however, Dullahan is one of the only two enemies that does NOT get as much of a challenge boost as all the others. The theoretical maximum amount of HP the game's code would allow any enemy to have is 16,383, so Dullahan when fought in Hard Mode will only have an extra 383 HP, instead of the 24,000 HP he should have in theory. (The other boss that hits the HP cap is Valukar, though he still gets a comparably sizable boost in HP.) He does, however, receive 845 Attack and 336 Defense in Hard Mode.
Arsenal[]

Dullahan's arsenal of abilities include some ferocious and crippling powers interspersed with some comparatively harmless status effect Psynergy, and since three of these abilities come in each of his turns, it is often that Felix's party does not survive long against him:
- Attack: This is a standard physical attack. This is the strongest normal attack in the game, but compared to his other skills is rather weak.
- Bind: This is a Psynergy spell that displays a holographic symbol onto a targeted Adept, attempting to Seal that Adept's Psynergy capabilities. It consumes 4 of its user's PP. While it does not seal Djinn or Summons, it is best to have this removed as it removes one's ability to use healing and reviving Psynergies. This is hardly a concern compared to Dullahan's other abilities.
- Break: This is a Psynergy spell that removes any statistical buffs from the current battling party. This ability consumes 5 of its user's PP. It is probable you wouldn't be spending your time buffing up your characters' stats in a fight like this, so Dullahan using this is akin to him giving your party a temporary reprieve. Note, however, that Break will remove all Elemental Power boosts as well, thereby weakening Summons and the power of healing spells.
- Charon: Dullahan has the capacity to freely use the second strongest Summon Sequence in the game (a sequence normally reserved for the player's party) as one of his battle commands. For all four Adepts in the current battling party, Charon could potentially instantly down each one, and if not it will inflict immense Venus-based damage with a power rating of 500. This is the only summon sequence in the Golden Sun series that can be specifically and freely used by an enemy. A common misconception is that he will not be able to summon Charon at all if the player has not collected it; in actuality, he is able to summon it regardless of whether the player collected it at the beginning of Anemos Inner Sanctum or not.
- Condemn: This is a Psynergy spell that projects an image of the Grim Reaper that approaches a targeted Adept and slashes once with its scythe, and the targeted Adept may be instantly downed. This ability consumes 8 of its user's PP. Of course, this is very bad if it connects, but very good if it misses, as that would equate to one of Dullahan's actions being wasted.
- Curse: This is a Psynergy spell that briefly generates a candle icon at the target Adept's position, and the target has a chance to get inflicted with a 7-turn Death Curse status ailment. This ability consumes 6 of the monster's PP. Although this battle may be longer than most battles, Curse is still not a threat compared to Dullahan's other abilities.
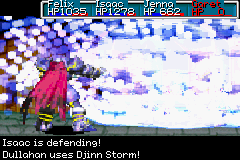
Dullahan using Djinn Storm to completely cripple the party's battling and summoning abilities, which can be game-ending.
- Djinn Storm: This unique monster skill, shared only with the Doom Dragon, is most likely the single most crippling and dangerous effect in the Golden Sun series. A screen-filling mass of multicolored energy erupts around the entire party, putting into Recovery mode all of the Djinn on all currently battling party members. This makes the entire party much weaker and more susceptible to attacks for quite a few turns. It wreaks havoc on each party member's class, removing the current party's ability to use its stronger arsenal of moves moves such as the Wish Psynergy series, the Revive Psynergy, and, of course, Djinn and Summons. Djinn Storm is notorious among Golden Sun players as one of the most unfair skills in the entire game, as it causing the disastrous effects listed above, and there is almost no way to avoid it(with the exception of Haze). It is best to use a Djinn that disables enemies such as Ground, Petra, and Lull on the turns where Dullahan would cast this. The player can reference the attack pattern shown below.
- Element Swap: This monster skill, despite what its name and its attached visual of Dullahan flashing with a rainbow light may suggest, simply does not have an actual battle effect other than him "passing" with this move. It is equivalent to other "non-moves" occasionally programmed into monsters' command lists to add "thematic flavor" while giving the monster the chance to let up on its otherwise repeated assaults, such as when the Doom Dragon "cannot move" and when enemies in the Thief monster line are reported by the game as glaring at you. It is, however, an indication that he is about to use his Venus-based moves, including Charon.
- Formina Sage: This is a monster skill where Dullahan wields a huge beam of purple lightning fashioned in the shape of a long sword and slashes through an Adept with extreme power while stationary, dealing a Jupiter-based attack equal to its normal physical attack multiplied by 2.8. With the damage output ranging between 800 and 1000 points, this will often down an Adept in one hit. The name "Formina Sage" itself is a mistranslation; the correct name for the skill should be "Fulminous Edge".
- Haunt: This is a Psynergy spell that causes a mass of purple skull symbols to swirl into each party member, and each affected party member has a chance to get inflicted with the Haunt status ailment. This ability consumes 5 of the monster's PP and has a range of 3. This should be healed, as the amount of damage dealt to the Adept is 1/4 the damage the Adept has dealt in a turn, so using a high-level Summon could instantly Down an Adept. Although more dangerous than Curse, this is still hardly something the player should be concerned about.
- True Collide: This is a monster skill where Dullahan siphons energy in the form of masses of dark-purple energy orbs out of up to three Adepts and into himself, dealing a Venus-based attack with a power rating of 180 and a range of 3. In addition, for each Adept struck, Dullahan has a chance to restore his own HP equal to the damage dealt to that Adept.
A little known fact about Dullahan in The Lost Age is that his attack order is pre-set. Beginning with Djinn Storm, Dullahan's attack command is as follows:
Djinn Storm, Haunt, Formina Sage;
True Collide, Attack, Formina Sage;
Break, Attack, True Collide;
Element Swap, Haunt, Curse;
Charon, Bind, Break;
Attack, True Collide, Formina Sage;
Attack, Element Swap, Attack;
Condemn, Charon, Curse.
Dullahan can begin the battle at any point in this 24-item list. One cannot, however, force him to shift to a completely different point in his attack command. Like with any other boss in Golden Sun, Dullahan will only use commands in his moveset if they will have an effect. For example, he will not cast Break if no one in the party has stat bonuses (and note that stat bonuses include Elemental Power increases after Summons), he will not cast Curse if all characters on the field are inflicted with Death Curse, etc.
One can manipulate his attack patterns so that Djinn Storm comes at the beginning of a turn, where it can be blocked. The two Djinn Petra and Ground will only block the first move of the enemy's turn, but once the move is blocked, Dullahan will continue through the cycle as if nothing happened and continue with Haunt and Formina Sage before the turn ends. If the Djinni Lull (which ends the turn immediately) is used, Dullahan will continue immediately where he left off. If Dullahan's Psynergy is sealed, he will immediately halt his progression through his attack command and instead use a small set of attacks including a normal physical attack and Formina Sage until the seal breaks; afterward, he will continue where he left off in the sequence.
Strategies[]
Dullahan, being the Golden Sun series' ultimate challenge, has multiple strategies: the summon rush strategy, the Lull strategy, and non-summon strategies.
Summon rush
Typically, players attempt to defeat Dullahan quickly with many repeated high-level summonings before he can annihilate them. Summon spells in Golden Sun games deal damage proportional to the size of each struck opponent's maximum HP meter, meaning that a 1-Djinn summon such as Jupiter will do over 300 damage to Dullahan, Moloch will do around 700, Meteor will do 1500, and Charon and Catastrophe will do around 3000. The following summon-specific setups are considered fairly reliable:
- The two Venus Adepts Isaac and Felix and the two Mars Adepts Garet and Jenna in the front party with the two Jupiter Adepts Ivan and Sheba and the two Mercury Adepts Mia and Piers in the back party, with most of everyone's Djinn on Standby. Have the first party summon Daedalus and other summons repeatedly until the first party is defeated. Make sure to keep the first party alive until Daedalus' second hit comes in -- this will make it much easier, though not technically needed. Then have the second party summon Eclipse repeatedly until either Dullahan is defeated or your party is. A possible addition to this strategy is using Granite on the first turn to keep the battling party alive longer.
- The two Venus Adepts Isaac and Felix and the two Jupiter Adepts Ivan and Sheba in the front party with the two Mars Adepts Garet and Jenna and the two Mercury Adepts Mia and Piers in the back party, with most of everyone's Djinn on Standby. Have the first party summon Charon twice and keep summoning Thor until the first party is defeated. Then have the second party summon either Meteor and Boreas repeatedly, or Ulysses repeatedly, until either Dullahan is defeated or your party is.
- Have the two original parties (Felix, Jenna, Sheba and Piers in one, and Isaac, Garet, Ivan and Mia in another) with all Djinn on Standby. Summon as much as possible, including Charon and Catastrophe. If luck is with you, you can use all the first party's summons in 2 turns before Dullahan crushes you. Repeat with the second party. With luck, you will achieve three turns or so before you go down, and in those you can defeat Dullahan. A member tried this on his 1st time around with Dullahan and succeeded with all original party members (Isaac, Mia, Ivan, and Garet) still standing.
- Another good strategy for Dullahan is to have all Djinn for both parties on standby, save one Djinn for each character. These should be the ones you are not likely to miss, like Shade or Ground. Enter the battle with Felix's party, with Isaac's party in the back. To start, have Felix summon Charon, Jenna summon Ulysses, Sheba summon Catastrophe, and Piers summon Ulysses as well. On the next turn, use whoever has the highest water power (probably Piers if he's still alive) and summon Boreas. Keep fighting until your first party is down and Isaac's party takes over and repeat the process.
Since the damage all these summons do is based on their users' elemental power ratings and nothing else, these chancey rush-summoning strategies can be pulled off by parties of a wide range of levels, including parties as low as level 30. Summons can also do noticeably higher amounts of damage if Adepts are equipped with items that effectively boost elemental power, such as Big Bang Gloves, Feathered Robes, and Triton's Wards. It is, however, useful to level all characters to level 50, because their added resiliency increases their chances that they will survive Dullahan's offenses. In this way, they can fit in more summonings in their limited time on the battlefield, which can be vital in determining the battle's eventual victor.
4 Ronin strategy:
For a true challenge, consider the "Four Ronin" strategy, in which one optimizes the Djinn setup of the Venus and Mars adepts in the party to have four characters with 210% base HP. All healing and most revival must be item-based, and if this front party falls, reset the encounter.
(1) EQUIPMENT Take a lot of speed-enhancing equipment, like the ninja hood (Golden Sun 1 PASSWORD !!!), aerial gloves (8: trial road), wild coat (8: trial road), running shirt, golden boot (8: trial road) etc.to give your characters a decent speed, faster than Dullahan, when his speed is halved (when your character does not have any djinn) when all your djinn are in recovery mode. Do not forget at least 4 spirit rings, the guardian ring (8 if you were able to get them via the trial road glitch). Weapons should always be Jupiter-related. So, no need to use a Sol Blade, unless you want to let the battle last longer. 4 Excaliburs are absolutely needed !
(2) ITEMS Take as much Water of Life as you can, as well as 30 Mist Potions per character to be safe, and do not forget Elixirs and Vials or Potions (costlier + healing priority, similar to the Jupiter Djinni Breath).
(3) Correct Djinn set-up. Give every character the ability to revive, and those who can't reliably a Djinni to protect a character or avoid damage completely, like Haze.
(4) CLASS Does not matter too much, except for Piers and Mia, who should be Pure mage and Guru respectively so they can use the Wish series and Piers his revive. The focus here is to stay alive as long as possible, to avoid damage to Piers and Mia and keep the number of passive djinn as high as possible for those two. Mainly by putting them in the back of the party or by using Haze on them - They should never equip that Djinni !
(5) Most important Djinni:
Mud/ Vine: lessen speed (Coal and Zephyr are better only used as fodder to summon); Haze: to protect healers ; Spritz, Crystal, etc: To provide support characters a way to summon, while healing ; Flash, Shade, etc: use as a temporary way to summon a more important entity. Ground/ Petra: to actually be able to attack. Lull: Coupled with speed; the 2nd djinni, besides Ground that actually enables you to attack, and not survive Dullahan.
(6) Death/ downed characters:
It can be used as a battle mechanic! Being downed acts like a "free" Haze. Djinn Storm does not affect downed characters when Dullahan uses his technique.
Battle:
General tactic:
Have at least 1 constant attacker (djinn/ Excalibur, last resort) and 2 to 3 support = keeping alive, not really healing - keep at least 3 characters alive (djinn storm). Use Luff and Rime (original explanation written below) and keep halving Dullahan's speed. Best djinn to use for summons, he attacker are Jupiter djinn due to his weakness to it. That's why the Excalibur is used as a free "last" resort, due to his unleash: Legend - only downside: it does not always occur.
Downed characters will be the rule here, not the exception. The battle here is done much more differently than you are used to. Make your characters as (relatively) quick as possible by slowing Dullahan with your speediest character or by enhancing the speed of the others. 4 characters should have 1 of those 4 djinn. The 2 speediest, having the djinn, paralyzing 1 turn.
Lull should be used by the slowest character, that AB-SO-LUTELY needs to be at least a little bit quicker than Dullahan, when his speed is halved, to actually give your party a chance to attack.
Try to keep 3 characters alive in the front party, in the back (preferably: all :D ) to constantly recover - attack. Try to attack each time at least once, being summons or the Excalibur (with Legend) as some "last resort". Djinni are relatively expendable here, so it is important to keep the number of characters above alive and mostly use the passive boosts as a way to gain extra defense, HP, but mostly ... Give yourself just that small extra Speed that does wonders ;) - You see: equipment is key here !
SUMMONS you better not use are those that require more than 5 djinn (the highest maximum - explan: 6 characters, 2 turn recovery), so you can keep attacking simply without relying too much on class changes and have the passive defense/speed/ HP boosts the Djinn grant you.
That's about it!
Lull strategy
Incorporating the Jupiter Djinni Lull into your summon-rushing strategy does in fact allow for a far more sure-fire battle than most would realize is possible. If you've raised your party's levels high enough and equipped all members with speed-increasing equipment like Quick Boots and Running Shirts that each member has over 250 agility even when all Djinn are on Standby, then you can effectively get an entire turn's worth of summoning in without Dullahan attacking if you use this method: Have Lull be the only Djinni Set and have him set onto your frontal party member with the lowest agility. Then on the first turn of the battle, have the other three members summon and then have your fourth-acting member use Lull to end everyone's turn, including Dullahan's. That way, the next turn will begin immediately without Dullahan having used any of his commands, and all four members can summon again. With the right setup of available summons and specific element-boosting equipment, it is possible to have Dullahan defeated by the second turn, before he can even execute a single command. It should be noted that the summon Moloch, which always halves Dullahan's speed, is useful when you are fighting with a party below level 50 (however, Moloch's speed-lowering ability will only cause Dullahan to act slower than normal starting on the turn following the summoning, not during the turn it is summoned, even if Moloch is the first command executed in the first turn of the battle).
A specific setup for the Lull strategy is as follows: Equip your best Crit-inducing gear to both Jenna and Felix, and set them both to Chaos Lords (2 Mars Djinn and 7 Venus Djinn for Jenna, vice versa for Felix), and give Jenna Tisiphone Edge, and give Felix Sol Blade. Set Sheba (and Piers) to Wizard classes (7 Mercury, 2 Jupiter for Sheba, vice versa for Piers), and equip Sheba with as many PP-recovery items as you have. Piers gets as many Luck items / Mercury Djinn as he can be afforded (while staying decently tanky). In order for this to work, you should try and catch Dullahan relatively early in his line up (the earlier, the better). Piers must also be the slowest member of your team for this to work -- if he's not, give him Turtle Boots. The strategy works as follows:
Turn 1: Felix attacks, Sheba casts Impact on Felix (or Wish Well if needed), Jenna attacks, Piers releases Lull.
Turn 1b: Felix attacks, Sheba casts Wish Well (Pure Wish if she has it), Piers sets Lull (without unleashing)
- Dullahan does his moves -
Turn 2: Felix attacks, Sheba casts Impact on Jenna (Wish Well if needed), Jenna attacks, Piers releases lull.
Turn 2b: Felix attacks, Sheba casts Wish Well (Pure Wish if she has it), Piers sets Lull (without unleashing again)
... and so on.
Using this strategy, both Jenna and Felix can cast revive, if necessary, and any Water of Lifes should go to Sheba (as Piers will be busy permanently casting Lull). Generally, this will kill Dullahan before he uses Djinn Storm, even with lower level characters. However, if he's about to use it, switch Piers out for Mia before Dullahan casts Djinn Storm (make sure your set up is roughly or exactly the same on your secondary team). Let the first team die (with Mia) and continue with your second team. You are guaranteed to defeat Dullahan before the second Djinn Storm comes, as you will effectively be dealing him between 1500 and 2000 damage with Sol Blade alone, by getting two attacks in per move Dullahan gets.
One important thing to keep in mind about this strategy is that it effectively enhances the effects of Curse in some respects, making it so you die in within 4 turns instead of 7. This effect however, can be completely avoided by casting pre-emptive revives on the character that's about to die with a slower character.
Non-summon strategies
- For those wishing to defeat Dullahan without resorting to "summon rushing", be prepared for a long fight. Be sure that everyone is at least level 50 (level 56 is preferable so as to unlock all Psynergy) and be sure to bring plenty of items. Keep everyone clear of status effects and their health relatively high; it's a simple battle, but very long and dangerous. Having a large stock of Mist Potions spread out among ALL Adepts can alleviate the pain of Djinn Storm. Mist Potions can be purchased in the normal item shop in Prox. Since at this point, almost all of your weapons and armour come from Artifacts found in chests, you'll probably have a VERY large surplus of coins just sitting around collecting dust. Alternating between unleashing the Mars Djinn Flash and the Mercury Djinn Shade (and to a lesser extent the Venus Djinn Granite) - where one Djinn is set to a party member on the turn the other is unleashed, can be an effective way to block most of Dullahan's damage to your party. Nonetheless, this strategy is particularly susceptible to Djinn Storm and can make summons difficult to execute without accidentally putting the most recently unleashed Djinn on recovery.
- Another possibility to defeat Dullahan without summons is to prevent Djinn Storm, since this is the main reason the party dies. For this strategy, we can have two different parties, a weak one and a strong one. The strong one will be composed by three Ronin and 1 healer. We will start the battle with the weak team and we will try to survive until Dullahan throws Djinn storm. Some of the weak members will probably go down, which is not a problem. As soon as he throws his first Djinn Storm we will change into the strong team. After this, we are going to prevent that the strong team is hit by Djinn storm. These are the ways of preventing it:
- Use Haze for protecting a party member
- Switch one of the members to the weak party ones. If you have a member that is down, it's better to use that one instead.
- Do not revive any member, since downed members are not affected by Djinn Storm.
In the worst case you will have 2 members at full power (the one in the back row and the one protected by Haze). In the best case, you will have 2 downed members along with them, so after you revive them, you will have your party at full power. If you have a Ronin, it is a good idea to use Megiddo and Revenge. On strong members, a Megiddo or a 3-arrow Revenge will deal much more damage than any other skill. I was able to see a 1400 Revenge damage on Dullahan.
- Suggested for a level 99 party: A non-summoning strategy that works well is to play out the fight with Dullahan as a damage race. Use the most powerful attack stats possible through Djinn setups for class bonuses and also use individual Djinn for their stat bonuses (preferably with the Venus and Mars Adepts as Ronin/Masters). Keep the Djinn with shield effects on your front four characters as Dullahan cannot break through them. Keep Ivan or Sheba acting as a healer on the front with Isaac, Felix and Garet. Keep loads of Potions and Water of Life on as many of your front four party members as possible. Don't use Psynergy for attacking (except with Ivan, Sheba and Mia, but they are just around to help revive your Venus/Fire Adepts in worst-case situations) and don't attempt to use status effects to your advantage as Dullahan is highly resistant (not immune, however) to them and likes to use Break on his first turn. Do not bother using summons to beat him, as getting the Djinn together takes far too much time and Djinn Storm is always going to come at the worst possible time and throw you off balance. Just use Ivan to heal your group and keep one of the others to keep him alive/resurrect him. Do not spend time trying to clear any status ailments that Dullahan puts on you (except stun, or any other debilitating effect). Usually right after cleansing the ailment, Dullahan will kill one of your guys anyway, so the point is lost. Only heal with Ivan if you know you can almost fully recover an ally, otherwise use Ivan to attack as well. If Dullahan uses Djinn Storm on you, your Venus/Fire adepts and Ivan (if set up properly) will all have access to revive/resurrect Psynergy at different points of recovery. You can survive through this phase as long as you heal characters well and keep the damage up. Ivan will get killed in one shot often, but it's best to keep him alive (you can use Jenna in his place too, but she lacks the extra utility of Ivan). -- If you can spare the effort, you can set up your back four characters before entering the battle to summon Iris (this is only possible when facing Dullahan in the arena mode), which will save you about 10 rounds of fighting and healing, but is not necessary to win. This will be a very prolonged battle, but it's a very effective and reliable way to win against him even multiple times consecutively.

Golden Sun- The Lost Age - Dullahan (Optional) Boss Battle
- Strangely, the Luff and Rime Djinnis is also quite effective on him, since he locks his moves to simple attacks, Formina Sage, True Collide and Element Swap, making him much less dangerous, because it only require good healing moves and enough speed to deal with him. But if he was on a turn when he used Charon or Djinn Storm, the move won't be stopped... A video demonstrating it is right here :

In Golden Sun: Dark Dawn[]
In the newest installment of the series, Dullahan is somewhat more manageable. He resides at the bottom level of Crossbone Isle, on the right side (the left side being home to Charon). His dwelling place is similar to that of his original encounter and he serves the same purpose: guarding the Iris summon tablet.
Thankfully, all 72 Djinn are not required to face this strong boss but it's advised to get as many as possible to help improve your parties chances of surviving.
His HP once again is roughly 16,000, and his attacks are similar to what he had available in the previous game. He regenerates 200 HP per turn (on top of whatever his skills may heal) and will not run out of PP.
- Attack: Typically in the order of 200 damage.
- Bind: Seals Psynergy.
- Break: Removes any temporary stat increases from your entire party.
- Charon: Powerful summon. Still has the chance to cause instant death on any of its targets.
- Condemn: Chance of instant death on a single target.
- Curse: Upon success, the target has eight turns to live.
- Djinn Storm: Puts all Djinn in the active four members of your party onto recovery. Does not affect your backup members.
- Element Swap: No effect (unconfirmed as to whether it has an effect on his resists or powers).
- Haunt: Upon success, the afflicted adept will randomly suffer sizeable damage.
- Crucible: Casts a summon against your party, using your own stand-by Djinn. Those Djinn are set to recovery.
- Dark Contact: True Collide. Hits your party with dark energy, and drains the total damage dealt (element info and range needed).
- Fulminous Edge: Formina Sage. Causes massive damage to a single target (typically around 400).

Once again, Dullahan's attack sequence is pre-set, but he can start at any attack in the sequence that follows. He still gets three attacks per turn. Cancelling his turns with Lull won't remove attacks from the sequence - he will resume exactly where he left off next turn. Psynergy sealing won't stop Djinn storm (though Haunt and Curse will be skipped), but Doldrum and Ivy will (as they stop anything).
Break is only used if it will have an effect. Similarly, Crucible is skipped if you have no stand-by Djinn. Dullahan's command loop is as follows:
Element Swap, Haunt, Curse, Fulminous Edge, Bind, Crucible, Attack, Dark Contact, Fulminous Edge, Attack, Element Swap, Attack, Condemn, Charon, Curse, Djinn Storm, Haunt, Fulminous Edge, Dark Contact, Attack, Fulminous Edge, Break, Attack, Dark Contact.
Doldrum and Ivy will only stop the first of his three commands in a turn - however, you can manipulate his turn order by cancelling Break and Crucible as described above.
In Dark Dawn, Dullahan does not require as much planning as in the previous game. It is sufficient to use a basic Sol Matthew-centric strategy. That is, everyone has an identical role - to keep Matthew alive and preferably buffed up, except Matthew himself, who simply attacks. Matthew should be in a class that maximizes attack (Chaos Lord or Master are adequate) and should be wearing Critical gear. Djinn that you intend to use should not be on Matthew. One or more (in case your favourite healer gets downed or Djinn Stormed) of your adepts should have the Wish series, and Revive.
Chain and Kite can provide additional damage output (which is appreciated in the face of Dullahan's healing capabilities, whenever the incoming damage dips). Shell and Chasm will help reduce incoming damage to pitiful levels, easily out-healed by Wish Wells (or Pure Wishes). It is not a waste of a turn to set these Djinn after use (or, indeed to summon a small summon to put them into recovery). The usefulness of Forge and Stoke is not to be underestimated, and should be unleashed if your are in a healthy position.
Use these as much as possible, especially against Fulminous Edge or Charon. Charon and Djinn Storm should be cancelled with Ivy or Doldrum where ever possible. It's unlikely that you will get to cancel both. If Charon downs some party members, leave them on the floor until after Djinn Storm hits.
Haze protects the one adept from Djinn Storm. Make sure to switch Matthew out to the back row before Djinn Storm. Put him back afterwards to resume attacking.
Recovering from a Djinn storm is not too difficult as long as you use Shell and Chasm appropriately, have a Reviver in the back row who can be switched in at any time, and have switched Matthew out in time (the attacking must continue before Dullahan heals away all of your work).
Trivia[]
It seems that the name of the attack "Formina Sage" is just a mistake from the translation from Japanese to English. "Formina Sage" and "Fulminous Edge" are quite close in Japanese phonetic, so it's maybe the origin of this error. It was corrected in Golden Sun Dark Dawn, where the attack is correctly named "Fulminous Edge".
It seems also that the French version of the game is a translation of the English version, and not the Japanese one, since "Formina Sage" becomes "Sage Formina" (Same mistake than in English) and "Fulminous Edge becomes "Lame Fulminante" (Correctly translated from English to French). Exactly the same happens in the Spanish version, since the mistranslated "Sabia Formina" of The Lost Age becomes into the correct translation "Hoja Fulminante" in Dark Dawn.
Cultural references[]
The dullahan is a powerful fairy from Irish folklore, and is essentially the Irish version of the Grim Reaper (its name means "dark man"). It takes the form of a horseman who carries his head under his shoulder. This head has tiny, constantly flitting black eyes, a hideous ear to ear grin, and flesh the color and texture of moldy cheese. Often, the horse itself is headless, and the dullahan may drive a coach pulled by several such headless horses. Gates cannot stop the dullahan's journey--they just unbar automatically as it approaches. Once the dullahan stops riding, it calls out a name. The mortal who is named dies, and the dullahan drags his or her soul to the afterlife. Those who try to spy on the dullahan riding across the country are rewarded with a bucketful of blood splashed in their faces. Curiously, dullahans are terrified of gold--even a gold pin can drive them away from their task. It is possible to even use Call Dullahan on the Dullahan in Anemos Sanctum, proving that there is more than one Dullahan like in Irish mythology.
That dullahans are so closely associated with death is probably the reason why Necromages can call upon one to fight on their behalf, and why the boss can call on Charon so readily.
External links[]
- A video of the Dullahan battle, where the Jupiter Djinni Lull is used to defeat Dullahan without him ever using an attack on the party
- A "low-level challenge" using a party whose levels have been hacked to their lowest possible values, and winning.
| Bosses in Golden Sun | |
|---|---|
| Vault Bandits • Tret • Saturos • Killer Ape • Hydros Statue • Manticore • Kraken • Toadonpa • Storm Lizard • Tempest Lizard • Saturos and Menardi • Final boss • Deadbeard | |
| Bosses in Golden Sun: The Lost Age | |
| Chestbeaters • King Scorpion • Briggs and Sea Fighters • Aqua Hydra • Serpent • Avimander • Poseidon • Moapa and Knights • Karst and Agatio • Flame Dragons • Final boss • Valukar • Sentinel • Star Magician • Dullahan | |
| Bosses in Golden Sun: Dark Dawn | |
| Tangle Bloom • Dim Dragon • Dim Dragon Plus • Stealthy Scout • Sand Prince • Ku-Tsung and Ku-Embra • Ice Queen • Sludge • Mountain Roc • Blados and Chalis • Blados, Chaos Hound, and Chalis • Final boss • Ogre Titans • Ancient Devil • Star Magician • Dullahan | |