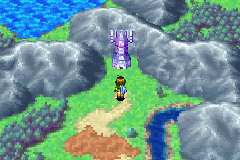
Jupiter Lighthouse is located on the southwestern continent of Atteka, northwest of Contigo.
Jupiter Lighthouse is the Elemental Lighthouse of Jupiter (Air), located in the top part of the western island continent of Atteka. It is a particularly massive and complex late-game dungeon in Golden Sun: The Lost Age, and can only properly be explored after having exchanged the Shaman's Rod for the Hover Jade Utility Psynergy item through the Trial Road event in Shaman Village. It is the site of dramatic story occurrences and a boss battle that may be won or lost, and after completing it the Reunion event awaits to be triggered in nearby Contigo.
While in the Lighthouse, both Sheba and Ivan receive 4 PP after every round in battle.
Walkthrough[]

This spot at the base of Jupiter Lighthouse features patches of leaves that will uncover a Mint when blown away.
Enter the physical lighthouse structure itself, ignoring the Cyclone-able bushes and the ladder to the left. Go left and follow the subsequent path until you get back outside the base structure. To the lower left is a cyclone portal similar to what was seen in Gabomba Catacombs, but before using it, go down the right, narrow path to a small group of leaf patches and use Cyclone. You will uncover a Mint. Now use Cyclone to take the cyclone portal down underground.
Follow the path until it forks up and down; take the fork down and Cyclone the plants here to engage a Mad Plant which rewards you with a second Mint. Now take the fork up, visit the room at the top end of this fork if you need to grab a Psynergy Stone, then go right and through the northeast doorway. The next room features a tile arrangement that has a pulsating purple circular tile for you to stand on; here, use the Hover Psynergy to hover in midair, and walk right over the elevated portion of floor so that when the Hover field runs out you drop onto it. Follow the path down, take the Cyclone portal back up, and now back in the Lighthouse structure, follow the path up and left to the beige doors from earlier. Push the yellow-tipped pillar onto the floor switch to permanently hold the doors open, and access into the main dungeon is thus granted.
Initial dungeon[]

The "main lobby" of Jupiter Lighthouse features several doorways to different parts of the dungeon.
The first large room you come across, with a narrow beam of energy pulsating through a well in the center, can be thought of as a "lobby" of sorts. Go through the doorway to the upper left. In the next hallway, go up the stairs to the upper left. The next room features a rolling pillar puzzle. Roll the topmost horizontal pillar up, roll the lower left horizontal pillar up, roll the vertical pillar left, roll the lower right horizontal pillar up, and roll the vertical pillar right into the gap. You can now open the chest containing the Erinyes Tunic, a solid piece of offense-enhancing armor recommended on an Adept with a weapon with a strong Unleash effect. Go down the exit at the bottom, and now back at the lobby on an elevated portion of its floor, take the Cyclone portal up to go through the top left doorway.
In a room that has one angel statue immediately visible, go up and use the Move Psynergy to move the yellow-tipped pillar right so that it falls. This will be useful much later, but for now go southwest, ignoring the cyclone portal along the way, and the subsequent series of screens linearly lead you through the lighthouse until you get to a room with a red door to the left (the cyclone portal here connects to the cyclone portal you just passed by). Go up to where a circular arrangement of pillars are, and cast the Reveal Psynergy so you can hop right across them. Go up the stairs.
When you get to a room that has a large amount of hop-able pillars, hop right onto another elevated portion of floor, and immediately from where you're standing, hop southwest to get to a small elevated portion of floor where a wall slide is, and slide down to ground level. There are three yellow-tipped pillars here to move; move the upper right pillar all the way left, move the center lower pillar one space left, and move the left pillar all the way up. Climb up the ladder to the left and go up to where the upper left stairwell going up is, but don't go up it; to the right of it, the winding, hop-able path to the enclosed chest is complete thanks to the yellow-tipped pillars you moved. The chest contains the Meditation Rod, a powerful staff with a Jupiter-aligned Unleash that may restore the user's PP. Hop all the way back to the upper left stairwell, and go up to the next floor.

"Show the power of the Anemos" on top of this ladder by casting the Hover Psynergy, which will activate many purple Hover tiles throughout the dungeon.
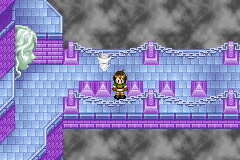
In the next floor, slide down the wall slide, climb up the ladder to the right, and follow the path down through a doorway, and in the subsequent room, go up the stairwell to the left. Follow it to reach the Lighthouse's aerie; unlike the other Elemental Lighthouses in the series, this Lighthouse's aerie is visited several different times because the well is sealed shut and puzzles need to be solved elsewhere to open it up. Go through the Aerie until you enter the doorway opposite the doorway you came out of, and follow the linear path down to a room with a circular fixture in its center. Slide down the wall slide below you, and as you move to climb up the center ladder, a spiritual message implores you to "show the power of the Anemos". Climb up to the top of the ladder and cast the Hover Psynergy; this turns on all previously inactive hover tiles throughout Jupiter Lighthouse, and the blocks that are on the ground are suddenly lifted into the air by the hover tiles below them. Hop right and go up the upper right doorway to return to a room you were in earlier.
The room that has a red key visible on an elevated portion of floor to the lower left now has its hover tiles active. Cast Hover on the tile near the center bottom to float onto the elevated floor to the left to claim the Red Key, and slide down. Now push the white block on the ground up until it is lifted up by the hover tile beyond it, and now you can climb up and hop left across it to climb back down the upper left stairwell. Back in the room where you got the Meditation Rod, go out the room's lower left exit onto a balcony portion of Jupiter Lighthouse with a floor switch; stepping on this switch makes a trap door open briefly. Push the white block in your way onto the trap door and trigger the floor switch to remove the block, and now cross the trap door and reenter the lighthouse through the upper right doorway. Back in the room again, go counterclockwise to the top center part and climb back down the stairs.
The circular arrangement of white blocks visible to the lower right is now floating, and can now be hopped across with the help of Reveal; this gets you to a chest with a Psy Crystal. Hop back left and reveal-hop your way across the left circular arrangement of pillars, and now backtrack through the linear path until you get to a cyclone portal flanked by two angel statues. Take it up to get to the red door, use the Red Key on it, and proceed west to Jupiter Lighthouse's first "sub-dungeon tower".
West sub-dungeon tower[]
Female statues like this one just outside the west sub-dungeon tower spout whirlwinds whenever Adepts cross into their line of sight.
Beyond the red door, when you go left along the bridge, a female face statue at its end will suddenly spout a whirlwind in your direction which will carry you back to the east end of the bridge. The purple blocks along the lower part of the bridge's walkable area feature gaps that you're supposed to run into to dodge the whirlwind, and you can run past the statue during the short gap of time in between its whirlwind spoutings. The quickest way past this part is that when you see the purple blocks and the three gaps amongst them, run quickly into the leftmost gap, then right after a whirlwind has passed, run left again past the statue. Enter the sub-tower, go past an archer statue, and in a hallway that forks left and right, open the left chest to battle a Mimic that rewards you with a Psy Crystal. Go through the right fork next, and you will eventually get to a room with a visible blue key and some roll-able pillars. Roll the right pillar down to reach the stairwell at the top, and go up to the next floor.
The next room has two chests visible and various floor tiles that crack and break away as they are walked on. Getting these chests requires puzzle resets; walk right and up across the safe tile, then go down the path to the left of the rightmost path with a tile to get to where an angel statue in this room is, and now the lower right chest containing 306 coins can be accessed. When you go back down, you fall through the tile back into the room below, so return upstairs and cross down into where the angel statue is, and exit out of the doorway below it. Immediately reenter the room to reset the tiles to their default states, then position yourself below the yellow-tipped pillar and remotely Move it one space left. Go back up to where the downstairs stairwell is, and from there go along the perimeter of the room counterclockwise so that you can hop right onto the yellow-tipped pillar. The upper left chest you reach contains a useful Mist Potion. When you fall through the tile to the upper left of the chest, go back upstairs to the room and exit the doorway below the angel statue. You will be linearly lead up some floors.
When you get to a room that has a mass of brittle tiles around where you stand, walk left once, down once, left twice, and up once along the safe tiles to get to the left hover tile. Use it to float to the solid ground at the left side of the room. Move the yellow-tipped pillar right onto the floor panel to keep the beige door below open, and now walk the visibly safe path of floor tiles all the way to the upper right hover tile. Hover straight down, and head south through the open door. When you soon reach the top of the sub-tower, move the conduit block above the archer statue into the hole to complete the conduit and make the statue shoot an arrow at the seal on the lighthouse's well. This sub-dungeon tower is partially complete, but something else must be obtained before you leave it, so go back down and fall through the cracked tile right below the stairwell. Return to the room with the mass of brittle tiles once again, and this time head for the upper right hover tile and float south. Walk to the lone tile at the center of the solid ground in the center of the room and fall through it; you will be falling through a series of similar tiles at the center of all the floors below until you fall next to the Blue Key at the base floor of the sub-tower, which you need to pick up.
A battle in Jupiter Lighthouse.
With the Blue Key now in your possession, your destination now is to return back to the "lobby", so using the Retreat Psynergy saves a lot of time for this. Back at the lobby, enter the northwest door again, but don't go up the upper left flight of stairs in the subsequent room; climb down the ladder and remotely Move the lone white block on the ground left one space so that it hovers up along with the rest of the white blocks. Now hop across them to access the upstairs stairwell to the upper right of the room. Follow the subsequent path back into the lobby, and push the conduit block off the elevated portion of floor. Slide down and move it into the hole in the ground to complete a conduit, and use Hover on the newly activated hover tile to get onto the elevated portion of floor to the left where another hover tile is. At the top part of this portion is a cyclone portal going up; use it to access the upper rightmost elevated door of the lobby, and in the subsequent room with a fork going up and one going down, go up and Move a yellow-tipped pillar one space left so that it falls into a gap; this will be useful later, and corresponds to a similar yellow-tipped pillar that you had moved earlier (now a "path" involving both of these pillars has been completed). Now go south to another outside balcony. Push the pillar with a lightning rod on it right into the hole, and a brief cutscene will activate a hover tile above. Return to the lobby and take the cyclone portal down.
The beam of energy flowing through the opening at the center of the lobby is made use of now: use the hover tile to the right of the beam to air-walk straight into the beam. You will be transported up along with the beam to another room with several floating white blocks, and the top of the beam you start the room off on functions as a hop-able platform. Hop right, climb down the ladder, and remotely Move the lone, left white block on the ground one space right so that it floats up with the other blocks. Climb back up and hop left to reach a chest containing a Potion. Hop back right and go down the lower right doorway, and follow the path to where a blue door is; ignoring the cyclone path down, use the Blue Key to open the door and exit out of the doorway to the right.
East sub-dungeon tower and beyond[]
The balcony area you emerge onto has a large statue of a female's head and chest pointing right, and a hover tile - the one the lightning rod block activated earlier - just in front of it. When you use the Hover tile, you will automatically be sent by a whirlwind from the female statue to the right end of the bridge connecting to the east sub-tower of Jupiter Lighthouse. Enter the tower's doorway, and in the subsequent horizontal hallway, enter the door immediately in front of you.

A difficult room in the right sub-dungeon tower that forces you to remain Hovering slowly while avoiding whirlwind-spouting female statues.
You get to a room with a conduit puzzle and a Jupiter Djinni on an elevated portion of floor to the left. Use the one active hover tile to get onto the right elevated portion of floor, push the right-and-up conduit block down off onto the floor below, slide back down, and move the conduit block into the lower right open hole. This activates a second hover tile, which you are then to use to get to the small elevated portion of floor to the upper left with a horizontal conduit block. Move it down off onto the ground below, slide down, and move the block left to complete another conduit; this room's mechanisms are set up so that when both of the conduit blocks are occupying an open hole, a Pound-able pillar to the upper right pops up out of the ground, and when that is Pounded back in, the two conduit blocks are ejected back out onto the open floor. To get the Djinni, hover up there and Pound it, and now move the up-and-right conduit block to the lower left open hole and the horizontal conduit block into the lower right hole the other block originally was. Use the newly activated lower left hover tile to walk over to the Djinni; save before battling it because of how much effort was required to get to it, and when you defeat it you add the Jupiter Djinni Whorl to your collection (if you have been playing the game perfectly up until this point, it is entirely possible that with Whorl, now all four of your Adepts have eight Djinn each). Afterward, use the same hover tile to hover to the upper left stairwell (it is sometimes missed that this hover tile is sufficient for both the Djinni and the stairwell) and go upstairs.
The next room features another puzzle involving hovering white blocks. Pound the pillar so that the conduit block in the hole to the right is ejected and the hovering blocks in the room fall back down, and Move it four spaces right and one space up so that it can be hopped across to climb down the long ladder to the right. At the lower ground of this floor are six white blocks total which you are to move onto the inactive hover tiles for later use; spend some time moving them so that, starting from the upper right white block that should stay where it is, a block is two spaces left of that, a block is two spaces down from that, a block is one space right of that, a block is two spaces down from that, and a block is two spaces right from that. Once the blocks are assembled, climb back up and Move the conduit block back into the hole to make the white blocks hover, and now you can hop over to the chest to the lower right, which contains a Water of Life. Pound to eject the conduit block again and go down to move the white blocks around again; this time, while the upper two blocks should stay where they are, a block should be two spaces below the upper left block, a block two spaces to the left of that, a block south of that, and a block two spaces left of that, which will form a hovering path that lets you hop southwest to the lower left exit.
At the top of the two sub-towers is an archer statue that will shoot to remove the large object blocking the well on Jupiter Lighthouse's aerie when you push a conduit block into the hole.
In the hallway you get onto, move the yellow-tipped pillar onto the floor switch, then go up the stairwell above it. The next room is a simple maze to the doorway at the top of the room. The next room after that features various brittle floor tiles and whirlwind-spouting female head statues, and there are actually two ways to get through; the less reflex-intensive way is to walk left, then run down past the square-shaped pit to avoid the whirlwind spouted by the upper right statue. Walk left across the safe tile under the square pit, then let the lower left statue transport you to the right via whirlwind. Walk right across the safe tile and go up the upstairs stairwell at the bottom of the room.
The next room features a mass of hover tiles covering the floor, and the arrangement of the unsafe tiles around the hover tile you stand on dictate that you'll be floating around this room the whole time. Cast Hover and float into the left part of the room, floating under the lone lightning rod block. Float straight up to the left of the lightning rod and the female statue's whirlwind should miss you - if you get caught up in any whirlwind in this room, you will land on an unsafe tile that drops you into the room below, and you will have to start over. To pass the obstacle the pair of lightning rods and the next female statue provide, position you shadow on the leftmost hover tile two spaces below the left lightning rod, then hover diagonally left over the line of unsafe tiles; while the whirlwind misses you, immediately float diagonally right against the tile the lightning rod occupies to get back into the hover field just above the lightning rods without running out of "floating power" and making you fall onto the unsafe tiles. This is somewhat tricky. If you manage to reach the chest, you gain the powerful weapon artifact Phaeton's Blade. Slide down and run to where the unsafe tiles around the stairwell entrance are, recast Hover, and float into the right part of the room. Beyond the first whirlwind-spouting statue on the right side of the room is probably the trickiest reflex-demanding part of the entire Golden Sun series, where a pair of lightning rods placed on the tiles below the line of sight of the upper right female statue leaves you an extremely limited window of opportunity to float past. Position yourself up against the right lightning rod, float diagonally right above the unsafe tiles, and try to reenter the hover field floating diagonally left not to soon (to barely avoid the whirlwind) and not too late (to barely avoid falling onto the unsafe tiles below). This will likely take multiple attempts. When you succeed, enter the upstairs stairwell.

These chains that can be swung across provide a relatively short path from the east sub-tower to the area where story-intensive cutscenes start occurring.
You are lead to the top of the eastern sub-tower of Jupiter Lighthouse, and just like with the top of the western sub-tower, push the conduit block into the hole to make the archer statue shoot at the seal blocking the well at the top of the Lighthouse aerie, and now with both statues having shot, the well is now open. You might not want to cast Retreat, though; go back down through the whole sub-tower, falling through cracked tiles whenever and crossing the trap door bridge you earlier set up by moving a yellow-tipped pillar onto a floor switch, and you should end up back at the bridge between the tower and the main Lighthouse relatively quickly. At the west end of the bridge, cast Lash on the coiled rope to climb down to where you moved the lightning rod block into the hole before you went to the eastern sub-tower to begin with, and enter the door. Go up northwest to where the dangling chain near the yellow-tipped pillar you pushed onto the ground earlier is, and like with Gaia Rock, cast Whirlwind to swing across. At the other end is another chain near a yellow-tipped pillar you pushed onto the ground much earlier in the dungeon; swing across that, and go southwest all the way down to the lower leftmost exit of the area; this doorway in particular is where you needed to go through after freeing up the aerie, and while casting Retreat to reach the door via going through the lobby and going through the "Erinyes Tunic room" is another way of coming here, this appears to have been a specifically designed route to this area from the eastern sub-dungeon tower.
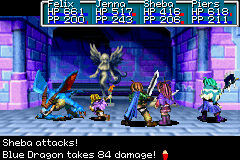
As soon as you enter out through the doorway, a lengthy and very story-relevant cutscene suddenly transpires. When you eventually regain control, follow the path back up through the main Jupiter Lighthouse like you did before, until you get to the "Meditation Rod room". After sliding down a wall slide and climbing up the ladder to the lower left of the room, another cutscene automatically transpires, which both heals your party fully and blocks you off from going up to the Lighthouse aerie. Go down the doorway immediately below to trigger another lengthy cutscene, at the end of which you will end up back in the same room with your party comprised only of Felix and Piers. Now you can follow the path through the remaining floors back up to the aerie of Jupiter Lighthouse, and approach the open well, select "Yes" at the prompt, and after another cutscene, a boss battle will occur. This is a particularly unique boss battle that is interrupted mid-fight with dialogue; at the end of the second turn - or if both Felix and Piers are downed in battle before then - Jenna will join the fight, and at the end of another two turns - or of Felix, Piers, and Jenna are all downed before then - Sheba will join the fight. From then on, this becomes the only boss battle you can lose and still progress through the rest of the game with, for whether you win or lose changes the cutscene right after the battle, and after this cutscene you will end up at the base of Jupiter Lighthouse to begin with. Winning the battle earns a good amount of EXP and a piece of Dark Matter, though. After the boss battle and the final cutscene, Jupiter Lighthouse is complete, so now return to Contigo.
Enemies[]
| Bestiary of Jupiter Lighthouse | ||||||||||
| Monster Name | LVL | HP | ATK | DEF | AGI | EXP | Coins | Weakness | Drop | Drop Rate |
| Blue Dragon | 32 | 408 | 349 | 121 | 133 | 490 | 297 | 1/64 | ||
| Devil Scorpion | 32 | 181 | 308 | 121 | 126 | 284 | 180 | 1/8 | ||
| Foul Mummy | 32 | 238 | 320 | 100 | 118 | 376 | 297 | 1/64 | ||
| Ghost Army | 32 | 250 | 342 | 136 | 133 | 454 | 254 | 1/64 | ||
| Macetail | 32 | 284 | 327 | 105 | 110 | 426 | 248 | 1/64 | ||
| Wyvern | 32 | 340 | 339 | 108 | 149 | 469 | 284 | 1/64 | ||
| Mad Plant (unique) | 35 | 726 | 352 | 99 | 152 | 1065 | 594 | 1/1 | ||
| Mimic (unique) | 35 | 907 | 349 | 108 | 204 | 1420 | 700 | 1/1 | ||
| Jupiter Djinni (Whorl) (unique) | 32 | 852 | 273 | 84 | 233 | 965 | 643 | N/A | N/A | |
| Agatio (boss) | 43 | 4248 | 377 | 114 | 178 | 3000 | 3740 | N/A | N/A | |
| Karst (boss) | 43 | 3186 | 354 | 107 | 235 | 2813 | 5280 | 1/1 | ||
Collectibles[]
This massive dungeon has a "main" tower structure connected to two smaller tower structures on either side, so it is worth dividing this section by structure. In the central structure, which is thoroughly explored first, are these items:
![]() Erinyes Tunic: In a chest at a solitary platform in a room with four pillars you can roll around, reached by rolling the one vertically-placed pillar right.
Erinyes Tunic: In a chest at a solitary platform in a room with four pillars you can roll around, reached by rolling the one vertically-placed pillar right.
![]() Meditation Rod: In a chest in a room with many hop-able elevated platforms, reached by properly arranging the yellow pillars.
Meditation Rod: In a chest in a room with many hop-able elevated platforms, reached by properly arranging the yellow pillars.
![]() Mint: At the ground-level start of the dungeon, when you exit the lighthouse structure out of the left entrance so that you're above a piece in the ground that you would normally cast Cyclone on, go southeast and use Cyclone on the four green patches of leaves on the ground. A Mint dropped by a Mimic will be revealed for grabbing.
Mint: At the ground-level start of the dungeon, when you exit the lighthouse structure out of the left entrance so that you're above a piece in the ground that you would normally cast Cyclone on, go southeast and use Cyclone on the four green patches of leaves on the ground. A Mint dropped by a Mimic will be revealed for grabbing.
![]() Potion: In a chest to the left in the room you end up in when you Hover yourself into the central beam of energy-charged light in the main "hub" of the dungeon and get transported up into the ceiling.
Potion: In a chest to the left in the room you end up in when you Hover yourself into the central beam of energy-charged light in the main "hub" of the dungeon and get transported up into the ceiling.
![]() Psy Crystal: In a chest to the right of a circle of pillars that can only be crossed when all the Hover patterns in the floors of the dungeon are turned on.
Psy Crystal: In a chest to the right of a circle of pillars that can only be crossed when all the Hover patterns in the floors of the dungeon are turned on.
![]() Red Key: Visible on an elevated portion of a room adjacent to the room where casting Hover turns on all the Hover patterns on the grounds in the dungeon. When the Hover patterns are all turned on, this item can be reached by casting Hover on the purple circle. This is used on the red door to the west, allowing you to explore the left tower structure, and is thus mandatory.
Red Key: Visible on an elevated portion of a room adjacent to the room where casting Hover turns on all the Hover patterns on the grounds in the dungeon. When the Hover patterns are all turned on, this item can be reached by casting Hover on the purple circle. This is used on the red door to the west, allowing you to explore the left tower structure, and is thus mandatory.
In the left tower structure of the dungeon, these treasures can be collected:
![]() Blue Key: At the bottom floor of the tower structure, reached by falling down from the center of the floor above in a series of pitfalls that starts at the floor near the top. This opens the blue door in the eastern part of the main lighthouse structure, allowing you to explore the right tower structure, and is thus mandatory.
Blue Key: At the bottom floor of the tower structure, reached by falling down from the center of the floor above in a series of pitfalls that starts at the floor near the top. This opens the blue door in the eastern part of the main lighthouse structure, allowing you to explore the right tower structure, and is thus mandatory.
![]() 306 Coins: In the right treasure chest in the room with two chests and tiles of ground you can fall through. You will have to fall through the ground after grabbing this chest's money.
306 Coins: In the right treasure chest in the room with two chests and tiles of ground you can fall through. You will have to fall through the ground after grabbing this chest's money.
![]() Mist Potion: In the left treasure chest in the room with two chests and tiles of ground you can fall through. Reached by entering the room from the bottom, casting Move to move the yellow pillar one space to the left, then getting to the chest counterclockwise. You will have to fall through the ground after grabbing this chest's potion.
Mist Potion: In the left treasure chest in the room with two chests and tiles of ground you can fall through. Reached by entering the room from the bottom, casting Move to move the yellow pillar one space to the left, then getting to the chest counterclockwise. You will have to fall through the ground after grabbing this chest's potion.
In the right tower structure of the dungeon, these treasures can be collected:
![]() Whorl: This Djinni is reached in a room where you must push pillars with the appropriate "paths" lining their tops so that the lower circle pattern on the ground will light up purple. This must be then battled to be acquired. Afterwards, re-solve the puzzle to make the upper circle pattern light up, so you can proceed to the next room.
Whorl: This Djinni is reached in a room where you must push pillars with the appropriate "paths" lining their tops so that the lower circle pattern on the ground will light up purple. This must be then battled to be acquired. Afterwards, re-solve the puzzle to make the upper circle pattern light up, so you can proceed to the next room.
![]() Phaeton's Blade: In a chest in the upper left of the room almost entirely covered with glowing purple Hover patterns. Dextrous moving is required to reach it.
Phaeton's Blade: In a chest in the upper left of the room almost entirely covered with glowing purple Hover patterns. Dextrous moving is required to reach it.
![]() Water of Life: In a chest in the lower left of a room with a complex network of glowing purple Hover patterns in the center of the ground. Reached by properly positioning the yellow platform pillars so you can hop to it.
Water of Life: In a chest in the lower left of a room with a complex network of glowing purple Hover patterns in the center of the ground. Reached by properly positioning the yellow platform pillars so you can hop to it.
It should also be noted that after completing both side towers, the story-heavy procession of cutscenes and battles in the main structure will replace your Mythril Bag item whose description reads "Holds the Jupiter Star" into an identical Mythril Bag item whose description reads "Holds the Jupiter and Mars Stars". This item will then disappear from your inventory shortly afterwards.
Background and story[]
Garet is left hanging for his life on Jupiter Lighthouse after he and Mia fall into a trap set by Karst and Agatio...
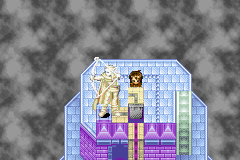
The Jupiter Lighthouse existed in Weyard's Ancient Past much like the other three Elemental Lighthouses as a source of its respective element in Psynergy and Alchemy. The structure is designed to work with the Elemental Star jewel of the Jupiter element, the Jupiter Star; if the Jupiter Star, the container of the purified essence of the Jupiter element, is cast down the well at the top of the Jupiter Lighthouse, its essence would be channeled by the Lighthouse's internal mechanics and be placed atop the aerie as a spherical beacon emitting Jupiter-based energy.
Originally located near Jupiter Lighthouse on Atteka in the ancient past was the City of the Anemos tribe of Jupiter Adepts, and it can be presumed that their civilization was provided at least in part by their proximity to Jupiter Lighthouse the same way the Mercury Clan was associated with the Mercury Lighthouse. The people living in the modern-day settlement of Contigo near where the City of the Anemos used to be have either an historical account or a legend of how Jupiter Lighthouse was originally lit, but that when the power of Alchemy was sealed away, part of that process involved putting out the beacon atop Jupiter Lighthouse; according to legend, the Anemos "suffered a great disaster" when Jupiter Lighthouse's beacon was put out. Another legend passed down to those living in Contigo, however, is that siblings of Anemos heritage living in the modern day and age would eventually come to light up Jupiter Lighthouse once again against darkness; this legend seems to be specifically referring to Ivan and Hama, who originally lived in Contigo and are Jupiter adepts.
...and Isaac and Ivan are engaged and defeated in battle by the Mars Adepts Karst and Agatio, the ones who set the trap.
The design of some the riddles within Jupiter Lighthouse that need to be solved in order for the Jupiter Star to be properly cast into the Jupiter Lighthouse's well demands an Adept to show "the power of the Anemos", specifically, the Jupiter-based power of flight the Anemos originally exhibited. While it seems no Jupiter Adepts remain today that possess the Anemos ability to hover with Psynergy, the specific power in question is contained within an artifact named the Hover Jade, which allows any Adept that has it to hover to some degree. However, the Hover Jade was a national treasure of the Anemos in the ancient past that its bearer, the hero Yegelos, exchanged with the Shaman Village hero Hoabna for the Shaman's Rod for mutual safekeeping, and the two heroes made a vow that the two items would be traded back should the need arise. Over the ages, though, Contigo's knowledge of the location of the Hover Jade was lost; all that is known amongst those living near Jupiter Lighthouse is that the Shaman's Rod is needed to obtain the Hover Jade. During the three-year period of time prior to the eruption of Mt. Aleph, the Mars Adept warriors of Prox research all of the Elemental Lighthouses, including Jupiter Lighthouse, for their plan to light all four Elemental Lighthouses and restore Alchemy to the world; their research is why Saturos knows that in order to climb and successfully light Jupiter Lighthouse in the future, he needs both a Jupiter Adept and the Shaman's Rod for a reason he is not aware of.
Late in The Lost Age, a group of traveling Adepts led by Felix - a former companion of the now-deceased Saturos continuing the quest to light the Lighthouses in his stead - and comprised of Jenna, Sheba, and Piers, enter the Lighthouse. Felix had previously taken the Shaman's Rod from Ivan, and later visited Shaman Village and successfully exchanged it for the Hover Jade with the help of Sheba as a Jupiter Adept herself; using the Anemos-associated power of Hover, Felix's group successfully opens the well that lies at the aerie of Jupiter Lighthouse. However, a trio of Adepts comprised of Karst, Agatio, and Alex enter Jupiter Lighthouse after them, and soon afterward, a third group of traveling Adepts enter in as well, led by Isaac and comprised of Garet, Mia, and incidentally Ivan. Isaac's group pursues Felix under the belief that if the Lighthouses are lit and Alchemy is restored, the world would be put in peril, and they had previously slain Saturos and his partner Menardi in combat back at Venus Lighthouse. Karst, the younger sister of Menardi, seeks vengeance upon Isaac because he murdered Menardi, and when she and Agatio are made aware that Isaac is in Jupiter Lighthouse, they discover and learn how to operate a trap on one of the tower's balcony levels, and lie in wait.

Felix saves Isaac from Karst's wrath by forcing her to spare his life in exchange for him lighting the Jupiter Lighthouse's with the Jupiter Star. Karst and Agatio consider Felix's intrusion treason...
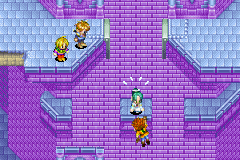
Isaac's party soon gets caught in the trap Karst and Agatio set up; Mia falls down onto a ledge below, and Garet falls in after her, injuring his left arm and leaving him hanging on for life with just his right. Karst and Agatio make themselves known to Isaac and introduce themselves, and Isaac tries to tell them off and say he'll rescue Garet himself and then stop Felix from lighting the Jupiter Lighthouse. Karst and Agatio explain about how they intend to have him dead in retaliation for his murder of Menardi and Saturos, and then clarify that they did not seek a "fair" two-on-two fight with Isaac and Ivan; they had brought Alex with them as a third Adept. Just then, however, Karst realizes Alex has disappeared and has abandoned them, and she and Agatio vow to punish him afterward as they fight Isaac and Ivan two-on-two. This entire procession of events is witnesses by Felix's group from a lower-level balcony, and they rush up through the Lighthouse to intervene; they are suddenly approached by Alex, who states that as he was watching Felix's party witness Karst and Isaac's side in conflict, he knows that Felix won't be bringing himself to light the Jupiter Lighthouse while leaving Isaac behind in harm's way. Alex heals all of Felix's group and sends them off to save Felix's former childhood friends so that Felix would light Jupiter Lighthouse afterward.
Karst and Agatio prove too powerful for Isaac and Ivan to handle individually, and they are rendered defeated on the ground from the powerful Mars Psynergy and combat abilities of the pair of Mars Adepts. The pair are weakened from the battle because of the surprising amount of resistance Isaac put up, but before they consider killing Isaac for good, Felix's group steps in to stop them. Felix's group uses their manpower to force Karst and Agatio to agree to spare Isaac's life in exchange for Felix lighting Jupiter Lighthouse, and though filled with rage, Karst consents to this with the added condition that Felix also takes the Mars Star currently in Isaac's possession, so that Mars Lighthouse may eventually be lit in the future. Isaac states out loud that while he does not know why Felix wants to light Jupiter Lighthouse, he trusts Felix's judgement, and hands over the Jupiter Star willingly. Karst and Agatio head up to the aerie of Mars Lighthouse and beckon for Felix to come up with them while his friends remain behind to help Isaac and Ivan and save Mia and Garet, but just before he leaves Piers accompanies him because Karst and Agatio are untrustworthy and may be dangerous. As Jenna, Sheba, and Kraden remain behind to tend to Isaac's group, Felix and Piers go up to the aerie of Jupiter Lighthouse and cast the Jupiter Star into Jupiter Lighthouse's well, which spectacularly establishes the Jupiter Beacon.
...and attempt to kill him and his party for good in front of the now-lit beacon.
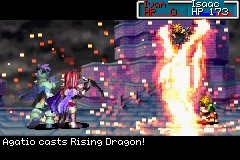
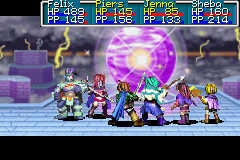
As soon as Jupiter Lighthouse is lit, Karst and Agatio announce that they have no trust nor further use for traitors like Felix. First, Karst states that the last lighthouse, Mars Lighthouse, is located near their hometown of Prox, and suddenly steals the Mars Star from Felix's grasp, explaining that she and Agatio can finish the job of lighting Mars Lighthouse themselves and therefore no longer need Felix. Karst and Agatio taunt Felix by saying that it is time for him to die, even though his parents currently held at Prox - the reason Felix originally went with Saturos on his quest to bring back Alchemy to begin with - would be let free once all four Lighthouses are lit. Karst and Agatio launch an offensive against Felix and Piers with the intent to kill, but suddenly Jenna comes up to the top of the tower, saying she knew something was wrong when Felix didn't come back after the beacon was lit, and joins them battle. Sheba joins in shortly after that for the exact same reasons, and Karst and Agatio must contend with four separate Adepts at once.
What happens after the battle varies depending on whether Felix's party wins or loses their fight against Karst and Agatio. Should Felix's group emerge victorious, Karst and Agatio command them to finish them off as they lie defeated on the ground, posing the hypothetical scenario that if they don't return to Prox either just like Saturos and Menardi won't be returning to Prox, the people of Prox might retaliate and kill Felix and Jenna's parents; the group doubts that, but before they take action Alex steps in. Alex heals Karst and Agatio enough that they can at least stand and walk, reasoning that if Karst and Agatio are not bluffing about Prox, then Felix's quest to win their freedom would be all for naught if he kills them, and also that Felix's only other course of action would be merely to leave them at Jupiter Lighthouse. Since Karst and Agatio now have the Mars Star, and Isaac's group has now recuperated and is also coming up to the lighthouse aerie, Alex easily convinces the Mars Adepts to flee Jupiter Lighthouse with him using the lighthouse's now-operational exterior elevator so that the Mars Adepts can return to Prox and try to light Mars Lighthouse on their own. Isaac's group reaches Felix's just as Alex and the Mars Adepts leave.
Before the two parties murder each other, Alex intervenes and convinces Karst and Agatio to escape with him, now that they have the Mars Star in their possession.
Should Felix's group be defeated, the four Adepts lie defeated on the ground, but alive nonetheless; Karst and Agatio remark that Felix's group was surprisingly powerful in battle just like Isaac was, but that Felix deserves death for his treason. Just then, Alex steps in to tell them off for their petty grudges. Karst and Agatio threaten Alex with death as a consequence for his own treason against them when he abandoned them earlier during their battle with Isaac, but Alex simply states that in the wounded condition they are, they are in no condition to fight him as well. The Mars Adepts become aware that Isaac's group has recuperated and is coming up to the Lighthouse aerie, and Alex drives the point home that unless the pair flee right now with him, they won't stand a chance in another battle. Since the Mars Adepts now have the Mars Star they'd need anyway, they begrudgingly agree to follow Alex to the now-functional exterior elevator from the aerie down to Jupiter Lighthouse's base, and flee just as Isaac's group comes across Felix's wounded party members. After expressing frustration at Karst and Agatio's escape, Isaac commands Mia to revive Felix and the others with her healing Psynergy.
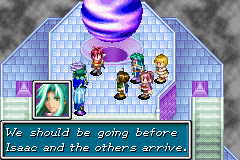
After either of the above scenarios transpire, Isaac demands an explanation from Felix as to what is going on, but before the tense interaction blossoms into something outwardly hostile, Ivan proposes that the two parties properly convene and discuss the many important matters in play right now in nearby Contigo. Felix's party members agree and promise to meet him, and Isaac leaves Jupiter Lighthouse with a stern warning to Felix that he cannot just run away again. Felix's party use the elevator to leave Jupiter Lighthouse themselves and head back down to Contigo. Jupiter Lighthouse is now lit, and though Ivan was not specifically the one to light it as per what the prophecy stipulated, he was involved in the events surrounding its activation.
At the end of Golden Sun: The Lost Age, all four Elemental Lighthouse Beacons are lit thanks to the efforts of Felix and Isaac's combined party of adepts at the aerie of Mars Lighthouse, but the entity which had originally tasked Isaac's group to stop Felix from lighting the Lighthouses, the Wise One, had tricked them into slaying the very parents Felix and Jenna had hoped to reunite with, driving the Adepts to grief and anger. Right after the Mars Beacon is lit, however, the Wise One appears in the dreams of Hama, currently located in Contigo, and instructs her to go to Jupiter Lighthouse, where she will be able to commune telepathically with everyone on top of Mars Light through a special effect the Wise One specifically would allow for.
Hama does as she is instructed and comes to Jupiter Lighthouse to commune with the Adepts and assure them that though the Adepts appeared to have suffered a great loss, they should not be deceived, for the Wise One has a caring heart. Obviously the Adepts don't buy that, but Hama tells them that the process shared between Jupiter Lighthouse, the other Lighthouses, and Mt. Aleph that brings the force of Alchemy back to the world will soon begin, and the energy involved will likely make all the Lighthouses quite dangerous, so she instructs them to flee from Mars Lighthouse before Hama leaves Jupiter Lighthouse. Then, as though the Lighthouses are linked, they shoot beams of purified energy from their respective beacons and merge them in the airspace above Mt. Aleph, forming the Golden Sun.
Trivia[]
- Jupiter Lighthouse is the only Lighthouse where four statues aren't placed around the Beacon. This is because a seal is placed on top of the well instead, which needs to be removed by climbing the two sub-towers. Once the seal has been removed, the Jupiter Star can be thrown into the well.