No edit summary |
(→Prizes: Revamped, but possibly still wrong; for Tolbi Spring I had to gather this info myself with repeated game testing. For Lemuria Spring I start off with some FAQ and discovered some more...) |
||
| Line 14: | Line 14: | ||
==Prizes== |
==Prizes== |
||
| − | These are lists of the prizes available by tossing a [[Lucky Medal]] into the Fountains. |
+ | These are lists of the prizes available by tossing a [[Lucky Medal]] into the Fountains. (Note that these may be incomplete, as they are compiled only through player testing) |
| + | |||
| − | ===Tolbi=== |
+ | ===Tolbi Spring=== |
| + | *'''Center, purple circle''' |
||
[[Image:Assassin Blade.gif]] [[Assassin Blade]]<br/> |
[[Image:Assassin Blade.gif]] [[Assassin Blade]]<br/> |
||
| − | [[Image: |
+ | [[Image:Earth Shield.gif]] [[Earth Shield]]<br/> |
| ⚫ | |||
[[Image:Spirit Armor.gif]] [[Spirit Armor]]<br/> |
[[Image:Spirit Armor.gif]] [[Spirit Armor]]<br/> |
||
| + | |||
| ⚫ | |||
| + | *'''First. yellow ring''' |
||
| ⚫ | |||
| + | [[Image:Assassin Blade.gif]] [[Assassin Blade]]<br/> |
||
| ⚫ | |||
[[Image:Cocktail Dress.gif]] [[Cocktail Dress]]<br/> |
[[Image:Cocktail Dress.gif]] [[Cocktail Dress]]<br/> |
||
| ⚫ | |||
| + | |||
| + | *'''Second, purple ring''' |
||
[[Image:Adepts Helm.gif]] [[Adept's Helm]]<br/> |
[[Image:Adepts Helm.gif]] [[Adept's Helm]]<br/> |
||
| − | [[Image: |
+ | [[Image:Assassin Blade.gif]] [[Assassin Blade]]<br/> |
| + | [[Image:Burning Axe.gif]] [[Burning Axe]]<br/> |
||
| + | [[Image:Earth Shield.gif]] [[Earth Shield]]<br/> |
||
[[Image:Glittering Tiara.gif]] [[Glittering Tiara]]<br/> |
[[Image:Glittering Tiara.gif]] [[Glittering Tiara]]<br/> |
||
| ⚫ | |||
| ⚫ | |||
| + | |||
| + | *'''Third, yellow ring''' |
||
[[Image:Earth Shield.gif]] [[Earth Shield]]<br/> |
[[Image:Earth Shield.gif]] [[Earth Shield]]<br/> |
||
| + | [[Image:Glittering Tiara.gif]] [[Glittering Tiara]]<br/> |
||
| + | [[Image:Grievous Mace.gif]] [[Grievous Mace]]<br/> |
||
| + | [[Image:Guardian Armlet.gif]] [[Guardian Armlet]]<br/> |
||
| ⚫ | |||
| ⚫ | |||
| + | |||
| + | *'''Fourth, blank ring''' |
||
| + | [[Image:Assassin Blade.gif]] [[Assassin Blade]]<br/> |
||
[[Image:Battle Gloves.gif]] [[Battle Gloves]]<br/> |
[[Image:Battle Gloves.gif]] [[Battle Gloves]]<br/> |
||
| + | [[Image:Kimono.gif]] [[Kimono]]<br/> |
||
| + | [[Image:Potion.gif]] [[Potion]]<br/> |
||
| + | [[Image:Psy Crystal.gif]] [[Psy Crystal]]<br/> |
||
| + | |||
| + | *'''Outside all rings''' |
||
| + | [[Image:Assassin Blade.gif]] [[Assassin Blade]]<br/> |
||
| + | [[Image:Battle Gloves.gif]] [[Battle Gloves]]<br/> |
||
| + | [[Image:Grievous Mace.gif]] [[Grievous Mace]]<br/> |
||
[[Image:Guardian Armlet.gif]] [[Guardian Armlet]]<br/> |
[[Image:Guardian Armlet.gif]] [[Guardian Armlet]]<br/> |
||
| + | [[Image:Kimono.gif]] [[Kimono]]<br/> |
||
| + | [[Image:Ninja Hood.gif]] [[Ninja Hood]]<br/> |
||
[[Image:Potion.gif]] [[Potion]]<br/> |
[[Image:Potion.gif]] [[Potion]]<br/> |
||
[[Image:Psy Crystal.gif]] [[Psy Crystal]]<br/> |
[[Image:Psy Crystal.gif]] [[Psy Crystal]]<br/> |
||
| − | [[Image:Water of Life.gif]] [[Water of Life]] |
+ | [[Image:Water of Life.gif]] [[Water of Life]]<br/> |
| + | |||
| ⚫ | |||
| + | |||
| ⚫ | |||
| ⚫ | |||
| + | *'''Center, purple circle''' |
||
| + | [[Image:SummonIconEclipse.gif]] [[Eclipse]] (guaranteed the first time you make this shot)<br/> |
||
| + | [[Image:Aegis Shield.gif]] [[Aegis Shield]]<br/> |
||
| + | [[Image:Erebus Armor.gif]] [[Erebus Armor]]<br/> |
||
[[Image:Hestia Blade.gif]] [[Hestia Blade]]<br/> |
[[Image:Hestia Blade.gif]] [[Hestia Blade]]<br/> |
||
| + | |||
| ⚫ | |||
| + | *'''First, yellow ring''' |
||
| ⚫ | |||
| + | [[Image:Aegis Shield.gif]] [[Aegis Shield]]<br/> |
||
[[Image:Erebus Armor.gif]] [[Erebus Armor]]<br/> |
[[Image:Erebus Armor.gif]] [[Erebus Armor]]<br/> |
||
| ⚫ | |||
[[Image:Floral Dress.gif]] [[Floral Dress]]<br/> |
[[Image:Floral Dress.gif]] [[Floral Dress]]<br/> |
||
| + | [[Image:Hestia Blade.gif]] [[Hestia Blade]]<br/> |
||
| + | [[Image:Mighty Axe.gif]] [[Mighty Axe]]<br/> |
||
[[Image:Minerva Helm.gif]] [[Minerva Helm]]<br/> |
[[Image:Minerva Helm.gif]] [[Minerva Helm]]<br/> |
||
| + | |||
| + | *'''Second, purple ring''' |
||
[[Image:Crown of Glory.gif]] [[Crown of Glory]]<br/> |
[[Image:Crown of Glory.gif]] [[Crown of Glory]]<br/> |
||
| + | [[Image:Erebus Armor.gif]] [[Erebus Armor]]<br/> |
||
| + | [[Image:Firemans Pole.gif]] [[Fireman's Pole]]<br/> |
||
| + | [[Image:Floral Dress.gif]] [[Floral Dress]]<br/> |
||
| + | [[Image:Hestia Blade.gif]] [[Hestia Blade]]<br/> |
||
| + | [[Image:Ledas Bracelet.gif]] [[Leda's Bracelet]]<br/> |
||
| + | [[Image:Mighty Axe.gif]] [[Mighty Axe]]<br/> |
||
| + | |||
| + | *'''Third, yellow ring''' |
||
[[Image:Brilliant Circlet.gif]] [[Brilliant Circlet]]<br/> |
[[Image:Brilliant Circlet.gif]] [[Brilliant Circlet]]<br/> |
||
| ⚫ | |||
[[Image:Crafted Gloves.gif]] [[Crafted Gloves]]<br/> |
[[Image:Crafted Gloves.gif]] [[Crafted Gloves]]<br/> |
||
| + | [[Image:Erebus Armor.gif]] [[Erebus Armor]]<br/> |
||
| + | [[Image:Hestia Blade.gif]] [[Hestia Blade]]<br/> |
||
[[Image:Ledas Bracelet.gif]] [[Leda's Bracelet]]<br/> |
[[Image:Ledas Bracelet.gif]] [[Leda's Bracelet]]<br/> |
||
| − | [[Image: |
+ | [[Image:Wild Coat.gif]] [[Wild Coat]]<br/> |
| + | |||
| + | *'''Fourth, blank ring''' |
||
| + | [[Image:Minerva Helm.gif]] [[Minerva Helm]]<br/> |
||
[[Image:Psy Crystal.gif]] [[Psy Crystal]]<br/> |
[[Image:Psy Crystal.gif]] [[Psy Crystal]]<br/> |
||
| − | [[Image:Water of Life.gif]] [[Water of Life]] |
+ | [[Image:Water of Life.gif]] [[Water of Life]]<br/> |
| + | [[Image:Wild Coat.gif]] [[Wild Coat]]<br/> |
||
| + | *'''Outside all rings''' |
||
| − | ===Lemurian Target Prizes=== |
||
| + | [[Image:Brilliant Circlet.gif]] [[Brilliant Circlet]]<br/> |
||
| − | Although this fact is not proven, each colored target ring specifies a group of the items which are randomly picked. Here are the categories of rings of which each item belongs. Study was conducted using 100 random [[Lucky Medal]] Drops. |
||
| + | [[Image:Crafted Gloves.gif]] [[Crafted Gloves]]<br/> |
||
| + | [[Image:Crown of Glory.gif]] [[Crown of Glory]]<br/> |
||
| + | [[Image:Firemans Pole.gif]] [[Fireman's Pole]]<br/> |
||
| + | [[Image:Floral Dress.gif]] [[Floral Dress]]<br/> |
||
| + | [[Image:Minerva Helm.gif]] [[Minerva Helm]]<br/> |
||
| + | [[Image:Potion.gif]] [[Potion]]<br/> |
||
| + | [[Image:Psy Crystal.gif]] [[Psy Crystal]]<br/> |
||
| + | [[Image:Water of Life.gif]] [[Water of Life]]<br/> |
||
| + | [[Image:Wild Coat.gif]] [[Wild Coat]]<br/> |
||
| − | '''Center Ring:''' Eclipse(only first time), Hestia Blade, Erebus Armor, Aegis Shield<br/> |
||
| − | '''2nd Ring:''' Mighty Axe, Floral Dress, Minerva Helm, Crown of Glory, Firemans Pole(rarely), Erebus Armor(rarely)<br/> |
||
| − | '''3rd Ring:'''Floral Dress, Firmans Pole, Crown of Glory, Minerva Helm, Ledas Bracelet, Erebus Armor (rarely), Aegis Shield (rarely)<br/> |
||
| − | '''4th Ring:''' Mighty Axe, Ledas Brace, Crafted Gloves, Firemans Pole, Wild Coat, Brilliant Circlet<br/> |
||
| − | '''Grayed Area:'''Psy Crystal, Potion, Water of Life, Wild Coat(rarely), Firemans Pole(rarely), Floral Dress(rarely), Ledas Bracelet(rarely), Mighty Axe(rarely) |
||
[[Category:Places]] |
[[Category:Places]] |
||
Revision as of 00:02, 8 August 2009
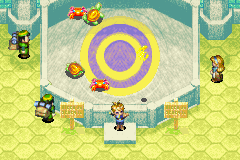
Tolbi Spring from the first Golden Sun.
The Lucky Medal Fountain is a minigame found in Tolbi in Golden Sun and in Lemuria in The Lost Age. It is the only place to find a wide variety of equipment, and the Eclipse Summon can be found in the Lemurian Spring.
Tolbi and Lemuria Springs
Chronologically, the first Lucky Medal Fountain built was in Lemuria. Babi and Lunpa discovered Lemuria over a hundred years ago and visited the civilization. During this time, Babi began playing the game and loved it so much that, when he returned to Tolbi with his Lemurian draught, he built a replica of the Lemuria Spring which appeared in the first Golden Sun.
Playing the game
To play the game, the player must stand in front of the fountain and look in the opposite direction of it. The player has a choice of either throwing a coin or a Lucky Medal behind their back and attempt to land it inside the fountain. Within the fountain are two yellow circular targets within one another, with a blue ring between the two. A blue "bullseye" is in the center. The prize won from the fountain depends on where the coin or Medal lands; for example, if it lands on the smallest target center, you win a grand prize. However, if the coin or Medal lands on the outside target, or on the blue area between the targets, you'll win a prize of less worth. As a general rule, the closer to the center the coin or Medal lands, the more valuable the prize is. If it lands outside the targets, it is unlikely you'll receive a prize of much worth. The turtles and crabs are objects that randomly move around the fountain, making it difficult to land a prize of your liking. If any of them are hit, not only will their colors change and increase their speed, but also your coin or Medal will bump off at a great degree and greatly alter the outcome of the coin or Medal's final landing. The turtles and crabs have three speed settings that follow a cycle; if hit a third time, they reset to their slowest speed.
Coins vs. Lucky Medals
Two objects can be thrown in, a coin or a Lucky Medal. Throwing a coin will earn the player more coins, if it at least lands within a target, that is. If the coin lands outside of a target, no prize is given. The maximum number of coins that can be won is 20. Throwing a Lucky Medal will win players a wide variety of prizes, depending on your landing. Valuable items and equipment can be won, all of which are Artifacts. Each Fountain has its own set of equipment that can be won, and all equipment won at the Fountains cannot be found anywhere else in the games. In The Lost Age, you can win the Eclipse Summon Tablet by scoring a perfect landing.
Random Number Generator
The Random Number Generator does indeed have an impact on what prize is received. In the first Golden Sun, this can be manipulated by saving, doing a hard reset, and then adding random numbers by entering and leaving the screen a certain number of times. By repeatingly resetting you can check how many times you have to change screens to receive certain items. However, at the time of this writing, it is not know exactly how to influence it or how to manipulate it for The Lost Age, since in this game, the random numbers used for the fountain are saved even when a hard reset is used. However, by using an emulator with a save state feature, it has been proved that the prize received in each zone is predetermined before the medal is tossed. This can, of course, be changed by adding random numbers.
Prizes
These are lists of the prizes available by tossing a Lucky Medal into the Fountains. (Note that these may be incomplete, as they are compiled only through player testing)
Tolbi Spring
- Center, purple circle
![]() Assassin Blade
Assassin Blade
![]() Earth Shield
Earth Shield
![]() Spirit Armor
Spirit Armor
- First. yellow ring
![]() Adept's Helm
Adept's Helm
![]() Assassin Blade
Assassin Blade
![]() Burning Axe
Burning Axe
![]() Cocktail Dress
Cocktail Dress
![]() Spirit Armor
Spirit Armor
- Second, purple ring
![]() Adept's Helm
Adept's Helm
![]() Assassin Blade
Assassin Blade
![]() Burning Axe
Burning Axe
![]() Earth Shield
Earth Shield
![]() Glittering Tiara
Glittering Tiara
![]() Grievous Mace
Grievous Mace
![]() Guardian Armlet
Guardian Armlet
- Third, yellow ring
![]() Earth Shield
Earth Shield
![]() Glittering Tiara
Glittering Tiara
![]() Grievous Mace
Grievous Mace
![]() Guardian Armlet
Guardian Armlet
![]() Kimono
Kimono
![]() Ninja Hood
Ninja Hood
- Fourth, blank ring
![]() Assassin Blade
Assassin Blade
![]() Battle Gloves
Battle Gloves
![]() Kimono
Kimono
![]() Potion
Potion
![]() Psy Crystal
Psy Crystal
- Outside all rings
![]() Assassin Blade
Assassin Blade
![]() Battle Gloves
Battle Gloves
![]() Grievous Mace
Grievous Mace
![]() Guardian Armlet
Guardian Armlet
![]() Kimono
Kimono
![]() Ninja Hood
Ninja Hood
![]() Potion
Potion
![]() Psy Crystal
Psy Crystal
![]() Water of Life
Water of Life
Lemuria Spring
- Center, purple circle
![]() Eclipse (guaranteed the first time you make this shot)
Eclipse (guaranteed the first time you make this shot)
![]() Aegis Shield
Aegis Shield
![]() Erebus Armor
Erebus Armor
![]() Hestia Blade
Hestia Blade
- First, yellow ring
![]() Aegis Shield
Aegis Shield
![]() Erebus Armor
Erebus Armor
![]() Floral Dress
Floral Dress
![]() Hestia Blade
Hestia Blade
![]() Mighty Axe
Mighty Axe
![]() Minerva Helm
Minerva Helm
- Second, purple ring
![]() Crown of Glory
Crown of Glory
![]() Erebus Armor
Erebus Armor
![]() Fireman's Pole
Fireman's Pole
![]() Floral Dress
Floral Dress
![]() Hestia Blade
Hestia Blade
![]() Leda's Bracelet
Leda's Bracelet
![]() Mighty Axe
Mighty Axe
- Third, yellow ring
![]() Brilliant Circlet
Brilliant Circlet
![]() Crafted Gloves
Crafted Gloves
![]() Erebus Armor
Erebus Armor
![]() Hestia Blade
Hestia Blade
![]() Leda's Bracelet
Leda's Bracelet
![]() Wild Coat
Wild Coat
- Fourth, blank ring
![]() Minerva Helm
Minerva Helm
![]() Psy Crystal
Psy Crystal
![]() Water of Life
Water of Life
![]() Wild Coat
Wild Coat
- Outside all rings
![]() Brilliant Circlet
Brilliant Circlet
![]() Crafted Gloves
Crafted Gloves
![]() Crown of Glory
Crown of Glory
![]() Fireman's Pole
Fireman's Pole
![]() Floral Dress
Floral Dress
![]() Minerva Helm
Minerva Helm
![]() Potion
Potion
![]() Psy Crystal
Psy Crystal
![]() Water of Life
Water of Life
![]() Wild Coat
Wild Coat